

How to Setup DNS on Windows 11 Control Panel?
Also, you are able to modify the DNS server through Windows 11 Control Panel.
1. Open Windows 11 Control Panel.
2. Navigate to All Control Panel Items > Network and Sharing Center > Change adapter settings.
![]()
3. Right-click on the target network connection and select Properties.
![]()
4. In the Properties window, find the Internet Protocol Version 4 (TCP/IPv4) or Internet Protocol Version 6 (TCP/IPv6) option and click the Properties button.
![]()
5. In the new window, choose Use the following DNS server addresses and input our preferred DNS addresses.
![]()
6. Eventually, click OK to save changes.
That is all!
How to Change DNS Server in Windows 11
A Domain Name System (DNS) translates human-readable domain names to IP addresses so that browsers can load the web pages on your screen. In most cases, when you get a new internet connection, your ISP sets one up for you.
However, apart from the default DNS server provided by your ISP, you have a slew of thir-party options to choose from.
For instance, in playing their part in making the web faster and more secure, has been providing free DNS services since 2009. Similarly, Cloudflare and OpenDNS are also some of the best alternatives for a safer and faster DNS service. We’ve provided the IP addresses for the individual public DNS below.
To get started with the DNS switch, follow the steps below:
- Go to Windows Settings (Win + I) and navigate to Network & Internet.
- Select Advanced network settings.
- From there, click on the network adapter available under the Network adapters option. For instance, if you’re using an Ethernet connection, then select that. Similarly, choose Wi-Fi if you’re using internet over Wi-Fi.
- Click on the View additional properties.
- Now select the Edit button in front of the DNS server assignment.
- Under the Edit DNS Settings, click on Manual and choose the IPv4 or IPv6 setting.
We’ve chosen the IPv4 setting for this example. Also, note that as soon you toggle on the IPv4, you’ll get a new set of empty fields to fill in. They are: Preferred DNS, Preferred DNS encryption and Alternate DNS.
Here are the DNS and alternate DNS numbers from Cloudflare, Google, and OpenDNS, that you can use for your new DNS server:
- Cloudflare: 1.1.1.1 and 1.0.0.1
- Google: 8.8.8.8 and 8.8.4.4
- OpenDNS: 208.67.222.222 and 208.67.220.220
In the above example, we’ve used Google’s DNS. You can pick any DNS server that you’d like to go with, enter the numbers in the appropriate empty fields, and click on Save. In a few seconds, your Windows 11 DNS server settings will be changed.
How Do DNS Servers Work?
The process of DNS servers matching domain names with their corresponding IP addresses involves four stages. All processes are handled by different DNS servers. These servers include:
- The recursive resolver
- The root nameserver
- The TLD nameserver
- The authoritative nameserver
The DNS recursive resolver takes the request from your web browser and contacts the root nameserver.
The root nameserver searches your URL’s Top Level Domain (TLD) and matches it to the correct TLD nameserver. TLD refers to the last part of your URL, like .net and .com. The TLD nameserver scans its database for the URL’s IP address.
It then forwards the info to the authoritative nameserver for it to validate the received IP address. Once done, it sends it to the device to help load the visited website.
This process happens if you’re connecting to a website for the first time, and it occurs within a couple of seconds or less with an averagely good internet connection.
After the process completes, your system stores the website’s URL and IP address information to a DNS cache to prevent it from repeating the process. It uses the cache file to find a URL’s IP address, which is faster.
Also Read: Here is How to View DNS Cache on Any Windows 10/11 Computer
How to Set up DNS on Windows 11 Settings?
First of all, you can change DNS from Windows 11 Settings.
Step 1. Open Windows 11 Settings
You can launch the Settings app in Win11 using the “Windows + I” shortcut on your keyboard. Or, you may directly click on the Windows 11 Start menu and select Settings in the popup.
Just click on Network & Internet in the left panel and select Advanced network settings in the right area.
![]()
Step 3. Find Current DNS Server
In the Advanced network settings page, unfold your current network connection and choose View additional properties.
![]()
Step 4. Change current DNS Server
Find DNS Server Assignment and click the Edit button for this option. Then, an Edit DNS settings window will pop up. There, select Manual in the drop-down menu. Next, switch to IPv4 or IPv6 relying on which type of IP connection you plan to modify.
![]()
Step 5. Setup New DNS Server
Below the IPv4 or IPv6 headings, input the primary DNS server address in the Preferred DNS section like 8.8.4.4 for Google’s free DNS service. Then, enter the Alternate DNS.
![]()
Step 6. Enable DNS Encryption
If you want to use DNS over HTTPS, which encrypts your DNS requests for improved privacy and security, just set both Preferred DNS encryption and Alternative DNS encryption to Encrypted Only (DNS over HTTPS). Yet, currently, only a few DNDS services in Windows 11 support DNS over HTTPS. So, make sure your DNS server supports DNS over HTTPS before turning on DNS encryption.
![]()
Finally, click the Save button to save the changes. Then, you will see the DNS servers with their encryption status beside your target network connection. From now on, all the network traffic that goes through the network adapter you modified will use the new DNS servers you have set up.
Note: If your encounter an Internet issue after altering DNS, just recheck your DNS server address to ensure it is correct. If it still not working, you may need to disable IPv6 in the DNS servers list for maybe your computer has no IPv6 connectivity.
Изменить DNS-серверы в Windows 11 с помощью настроек
Если ввод команд не для вас, приложение «Настройки» — лучший способ изменить DNS-серверы. Вы даже можете легко настроить DNS через HTTPS (DoH), что обеспечивает большую конфиденциальность и безопасность благодаря шифрованию входящего и исходящего трафика DNS с вашего компьютера.
Чтобы изменить DNS-адрес Windows 11 с помощью настроек, выполните следующие действия:
- Открыть Настройки.
- Нажмите на Сеть и Интернет.
- Нажмите на Ethernet вкладка
- В разделе «Назначение DNS-сервера» нажмите кнопку Редактировать.
- Выберите Руководство по эксплуатации вариант с помощью раскрывающегося меню.
- Включите IPv4.
- В разделе «Предпочитаемый DNS» укажите IP-адрес DNS-сервера Яндекс, Google, OpenDNS или другого сервиса.
- (Необязательно) В разделе «Предпочитаемое шифрование DNS» выберите Только зашифровано (DNS через HTTPS) возможность включить DNS-шифрование.
Краткое примечание: Возможность включения шифрования будет доступна только в том случае, если Windows 11 обнаружит службу для поддержки этой технологии. - В разделе «Альтернативный DNS» укажите IP-адрес вторичного DNS-адреса.
- (Необязательно) В разделе «Альтернативное шифрование DNS» выберите Только зашифровано (DNS через HTTPS) возможность включить шифрование для вторичного сервера.
- Нажмите Сохранить.
После выполнения этих шагов компьютер продолжит использовать конфигурацию динамического сетевого адреса, но теперь он будет использовать указанные вами статические DNS-серверы.
Ways to Enable or Disable DNS Client Service in Windows 11 and 10
Here is How to Enable or Disable DNS Client Service in Windows 11 or 10 –
Way-1: Take the help of System Configuration
Step-1: Press Windows and R on the keyboard simultaneously to invoke Run dialog box.
Step-2: Once appears, type msconfig in the text box located next to Open and hit Enter.
Step-3: System Configuration wizard will show up now. Here, click on Services tab.
Step-4: Locate DNS Client from the available services. If you wish to Disable DNS Client Service, untick the checkbox of the same.
Step-5: To keep the service enabled, simply click on the checkbox to keep the tick mark.
Step-6: Subsequently, Click Apply and then OK button.
Step-7: Reboot the device otherwise the changes will not take place.
Way-2: Enable or Disable DNS Client Service using Services Console
- Press Win+Q to bring up the Windows search bar.
- Type services.msc in the text field and hit Enter when the result rolls out.
- On the console, find out DNS Client located under Name column.
- Make double-click on the same to open its Properties.
- Go to Startup type segment and use the drop-down menu to choose Automatic.
- Now, click on the Start button to enable DNS Client Service in Windows 11 or 10.
- To disable the same service, simply hit the Stop button.
- Finally, click Apply followed by pressing the OK button to make the changes effective.
Way-3: Use Registry Editor
You can Enable or Disable DNS Client Service in Windows 11 or 10 by changing the value of registry entries. But, keep in mind that if you do it incorrectly, your PC may get affected by a serious issue.

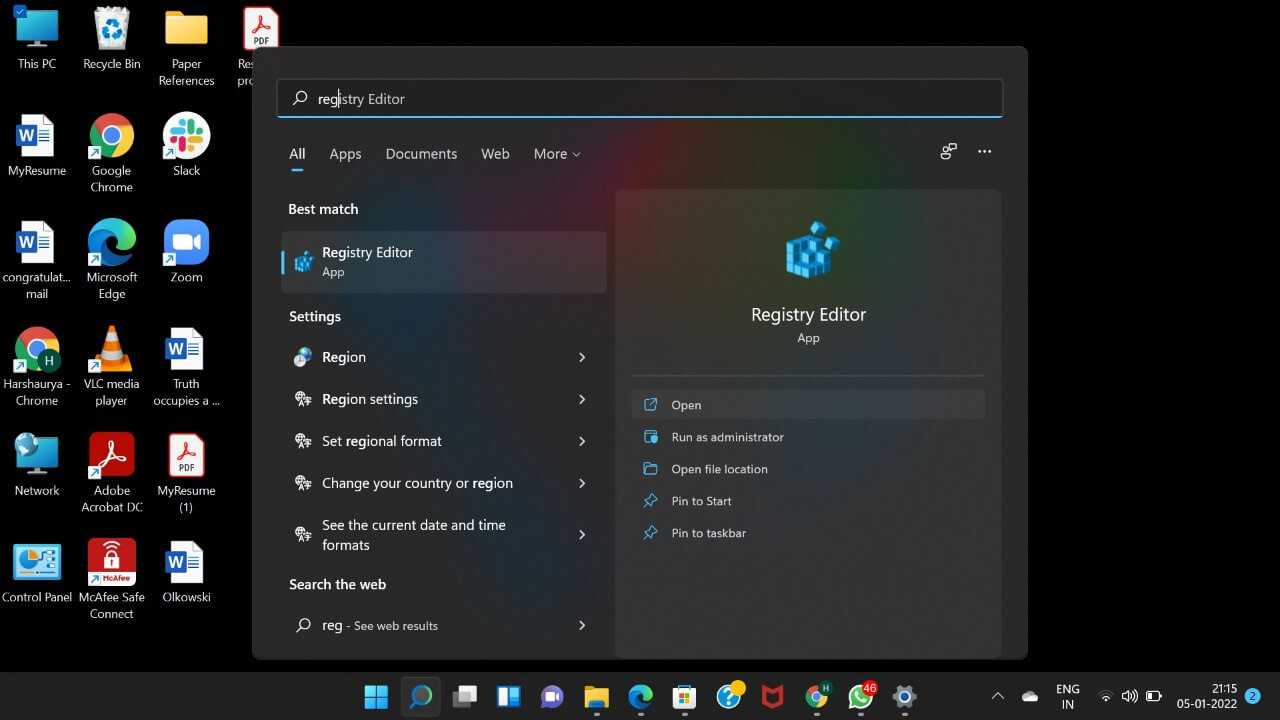
- Click on Start menu icon and type regedit.
- When the result comes up, hit Registry Editor option.
- A UAC will prompt up, click on Yes for positive consent.
- Once Registry Editor page comes into the view, navigate the following path from the left pane –
- Once you reach there, shift to the adjacent right side. Double click on the Start DWORD to modify its value.
- In the Value data box, put preferred value followed by clicking OK button.
Automatic – 2
Manual – 3
Disabled – 4
Automatic (Delayed Start) – 2
Way-4: Via Command Prompt
The procedure to Enable or Disable DNS Client Service in Windows 10 or 11 using the Command Prompt is given below –
Step#1: Open Run dialog box.
Step#2: Type cmd.exe in the empty text bar and hit Ctrl+shift+Enter shortcut at the same time.
Step#3: If a UAC turns up, click Yes to run Command Prompt as admin.
Step#4: To disable DNS Client Service in Windows 11 or 10, run the below command in elevated Command Prompt –
Step#5: To enable the same, type the following and hit Enter to execute –
This will Enable DNS Client Service instantly unless otherwise, the Startup type of this service is Disabled.
Step#6: To change the Startup type, execute the preferred command listed below –
Automatic –
Manual –
Disabled –
Automatic (Delayed Start) –
That’s all!!
Reasons to Flush DNS on Your Computer
![]()
A graphical representation of the 404 error
If you’re unable to clear or reset the data in the local DNS cache then you’ll be in serious trouble when trying to access websites or use apps that fetch data from the internet using the operating system. Thus, most operating systems let you flush the DNS resolver cache so that it can update itself. Here are the reasons why you might want to use the Flush DNS command on your Windows 11 PC:
- When you try to access a website you know exists but repeatedly get the 404 error, you can reset the local DNS cache.
- You’re trying to access a website and the browser is taking you to the dated version of it. In this situation, you must flush and reset the DNS cache.
- The local copy of the DNS resolver cache is also a privacy concern. If you browse websites, online apps, internet banking portals, and run business apps from a public or third-party Windows PC, you may want to flush the DNS before leaving. It helps you to wipe clean your online activities on a public PC.
- If you think you have become a victim of DNS spoofing or DNS cache poisoning, you must flush the DNS resolver cache of your computer.
- You use business apps like enterprise resource planning (ERP), customer relationship management (CRM), online SQL database, etc., and these apps are unable to fetch the latest data from the cloud or on-site server.
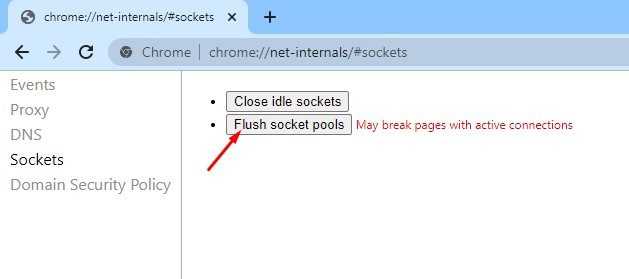
Flush and Reset the DNS Resolver Cache on web browsers
We do a lot of internet browsing. Our browser web pages and other information in the browser’s cache so that it would be faster for it to fetch the webpage or website next time. It sure helps in faster browsing but over a period of a few months, it accumulates a lot of data that is no longer required. So, in order to speed up the internet browsing and overall performance of Windows, it’s a good idea to clear the browser cache from time to time.
First to Flush and Reset the DNS Resolver Cache on web browsers
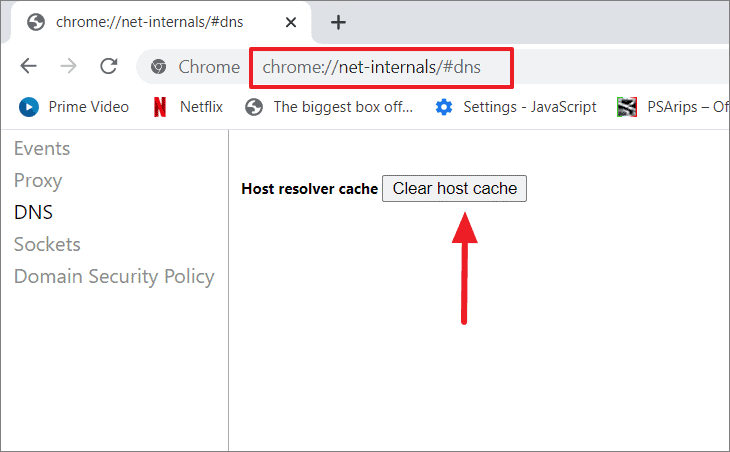
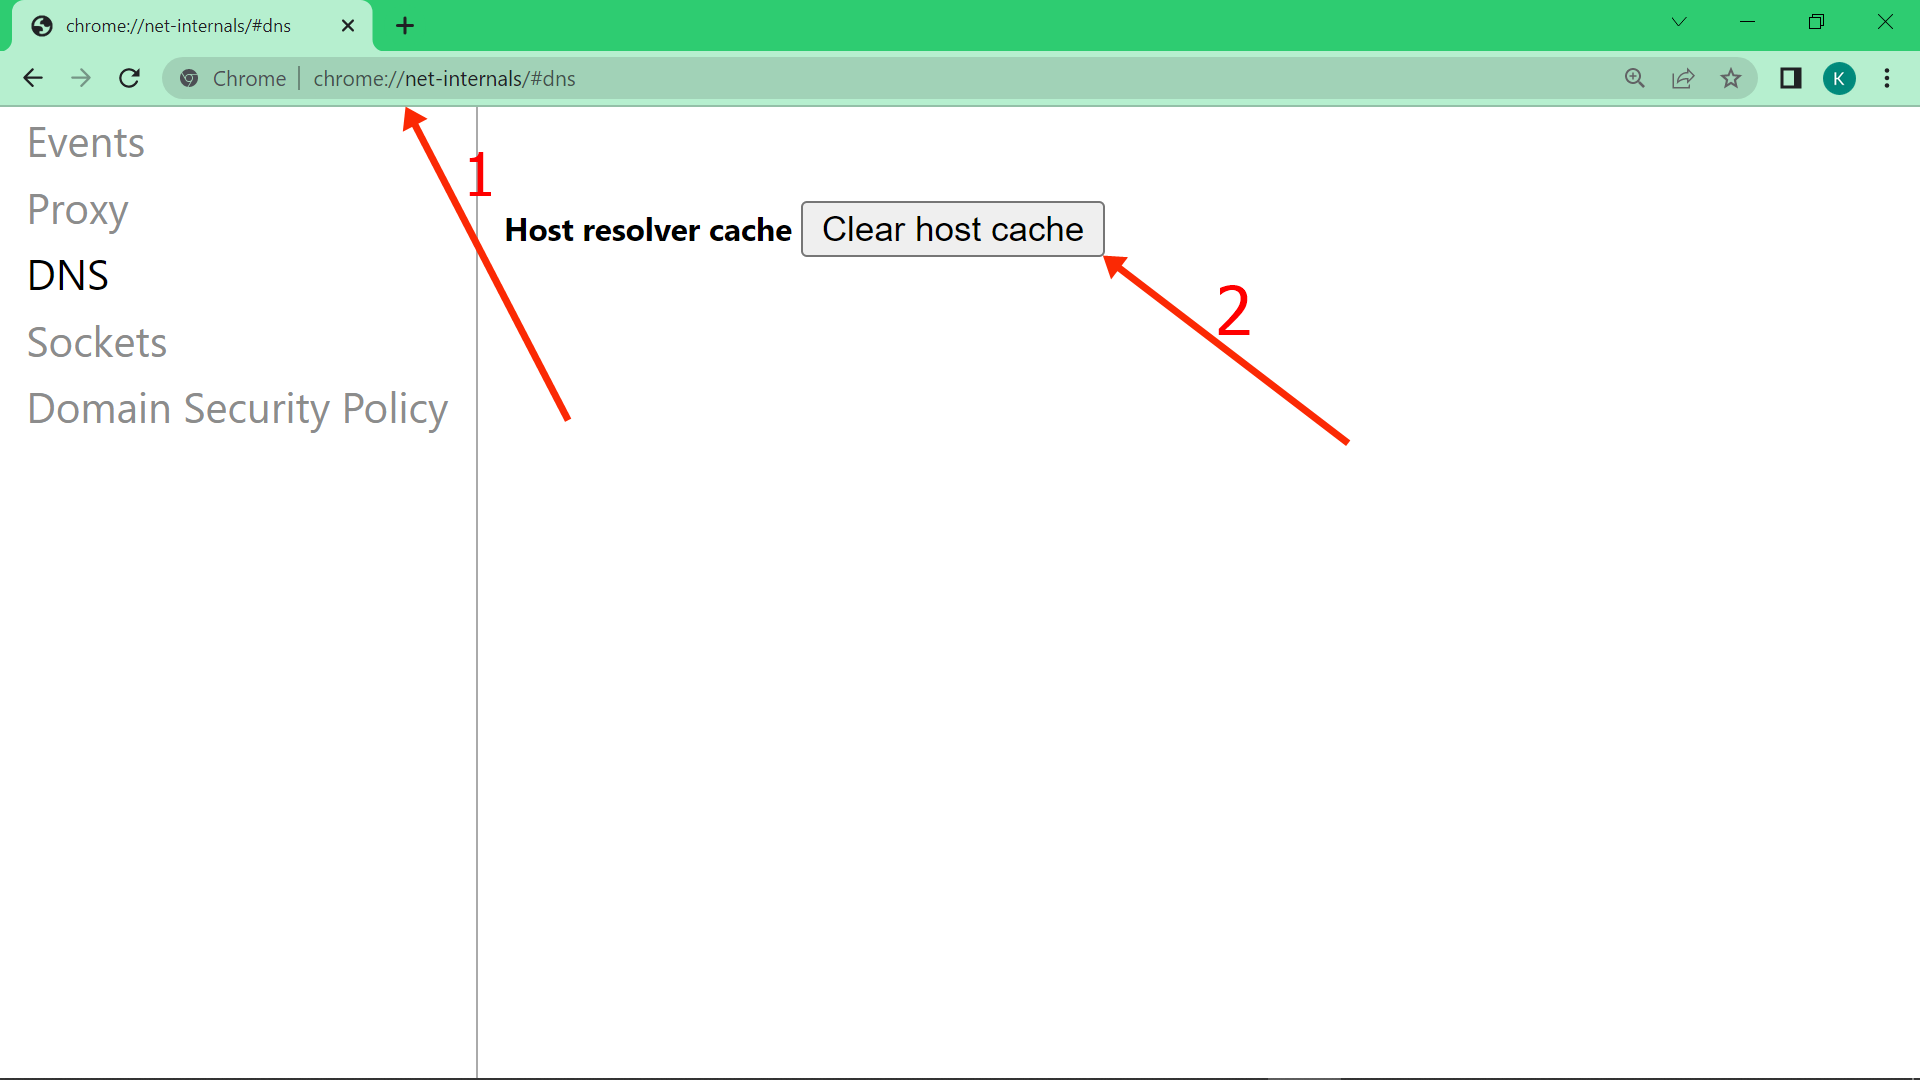
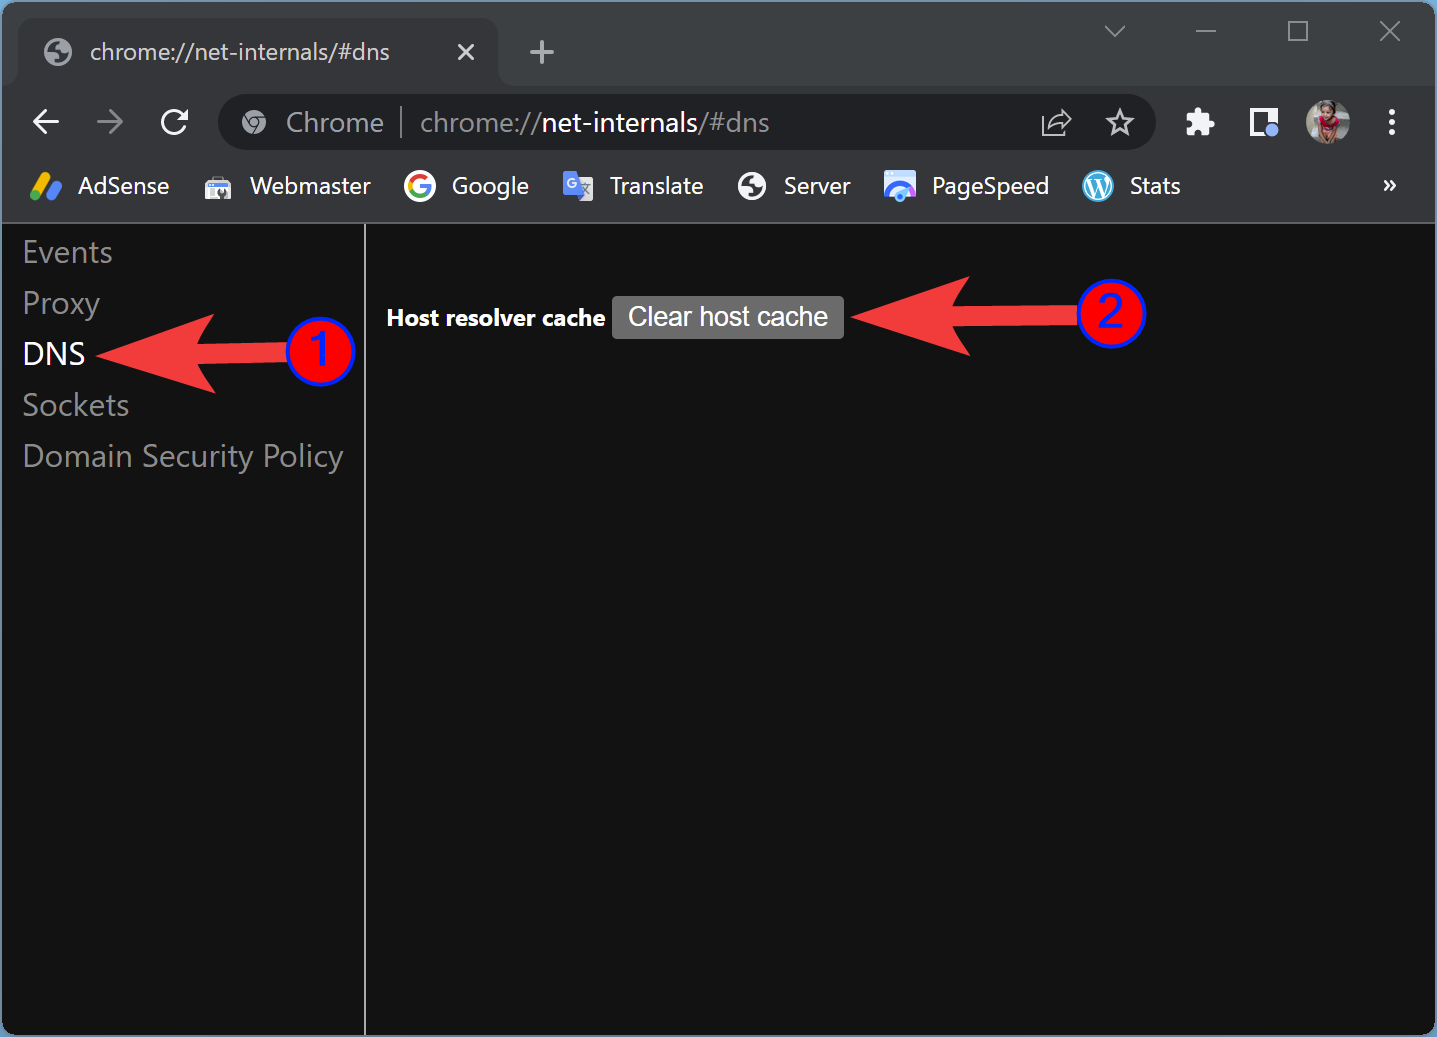
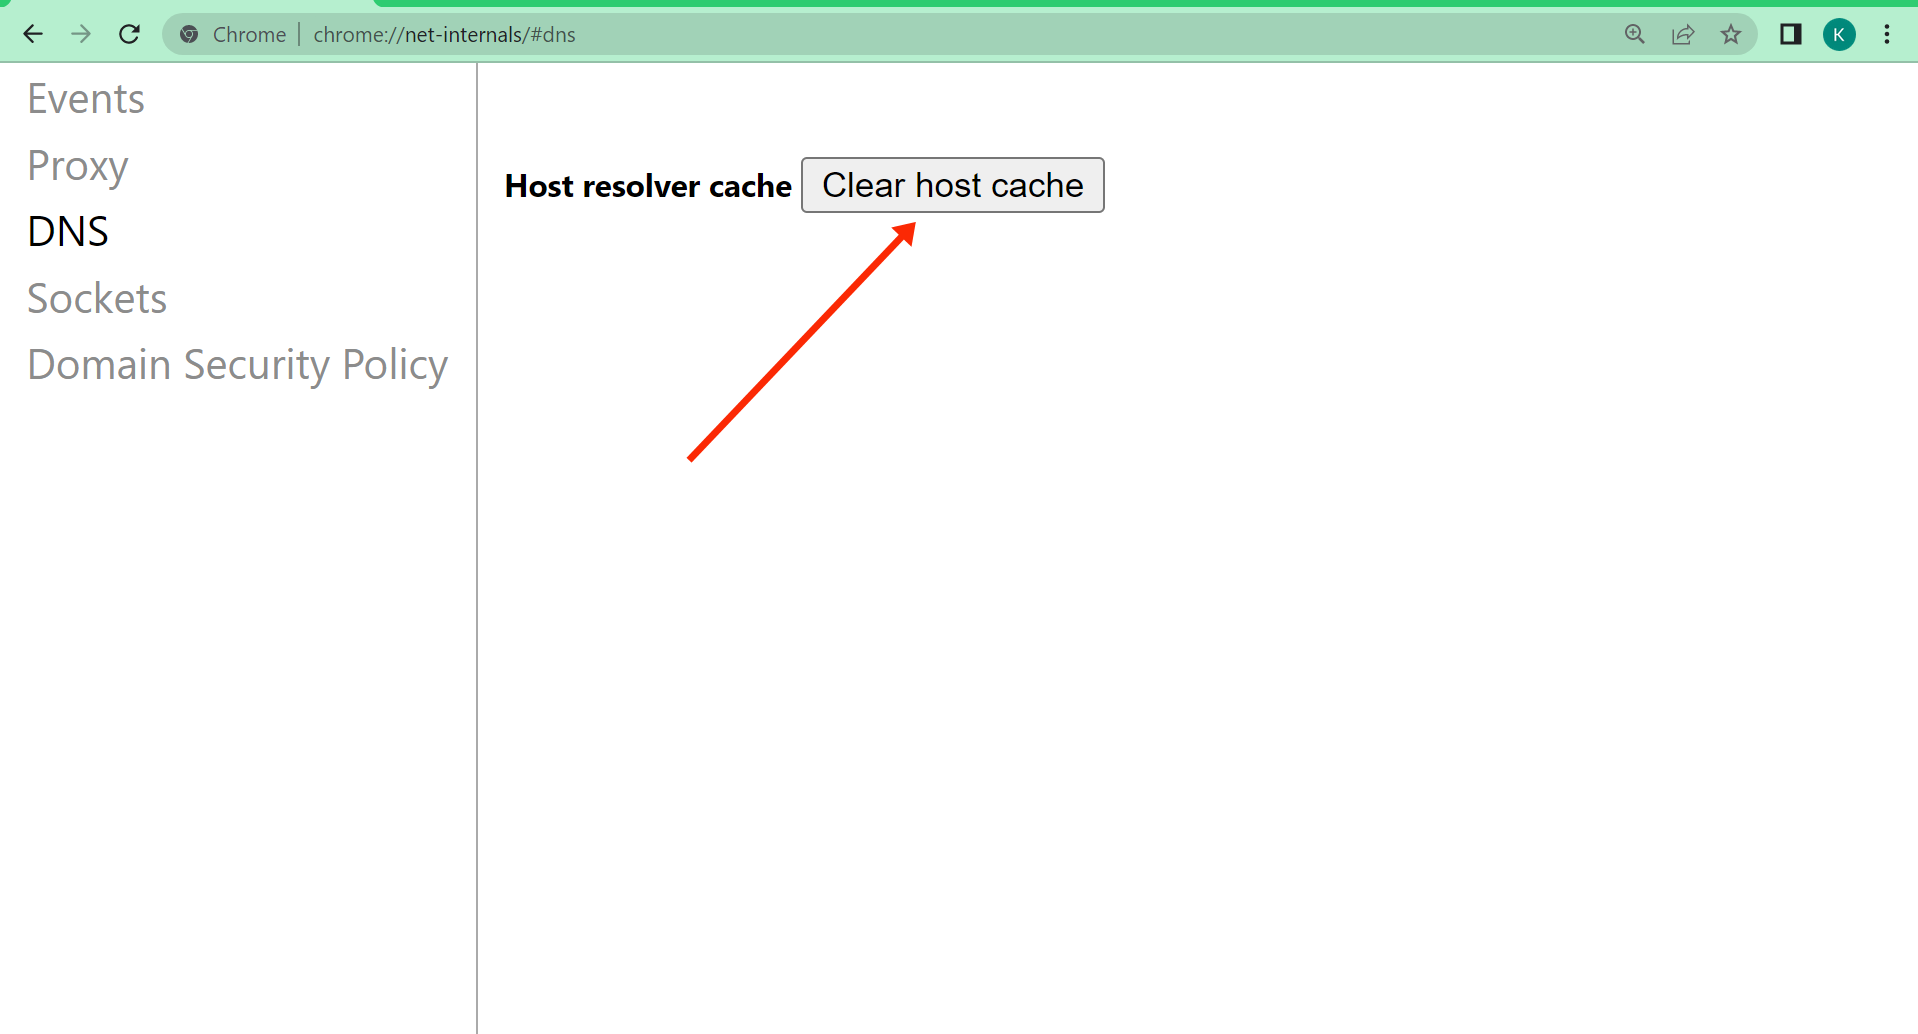
- Open Chrome type chrome://net-internals/#dns and press enter key
- If you are Microsoft Edge user type edge://net-internals/#dns and press enter key
- Beside the Host resolver cache text, click the Clear host cache button.
![]()
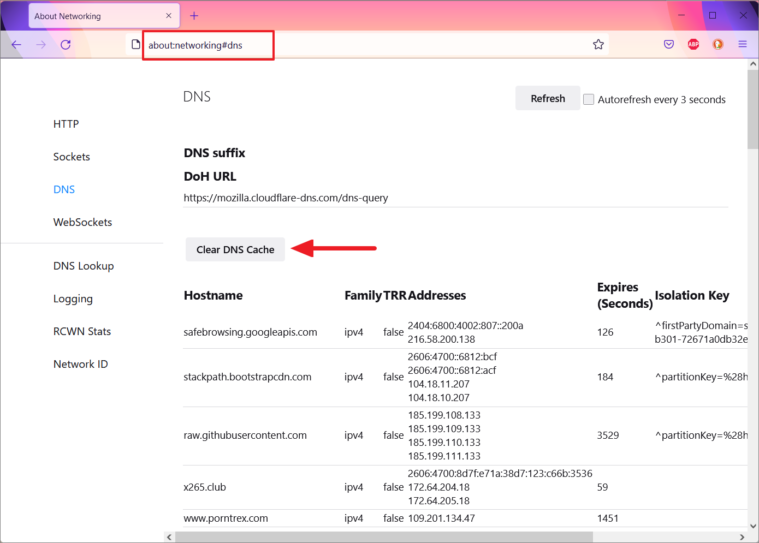
Mozilla Firefox users type about:networking#dns and press enter, then click on Clear DNS cache option.
![]()
To Clear the Browser cache
If you are Microsoft Edge or Googe chrome user:
- Open the browser and press shirt + Ctrl + Del to open the Clear browsing data pop-up,
- Check mark on cached images and files, (You can select other options as well) select time rage and click Clear Data.
![]()
Clear Cache Data on Firefox browser is a little different,
- Open the Firefox browser, at the address bar type about:preferences#privacy and press enter key
- Checkmark next to cached web content and click on clear.
![]()
What is DNS resolver cache?
DNS resolver cache is a temporary storage that stores DNS information on your device to speed up future DNS queries.
Why would I need to flush DNS resolver cache?
Flushing the DNS resolver cache is necessary to resolve domain name resolution issues, clear outdated or corrupted entries, and fetch the latest DNS information.
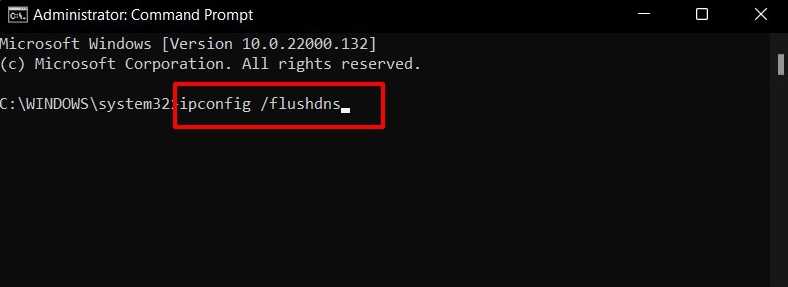
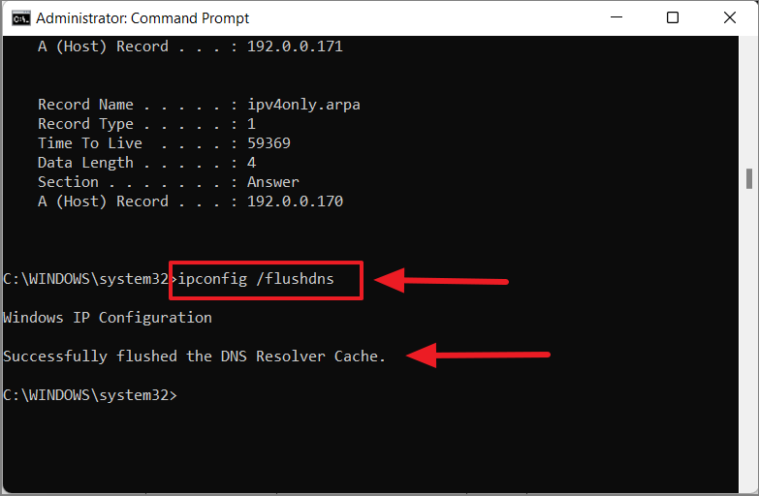
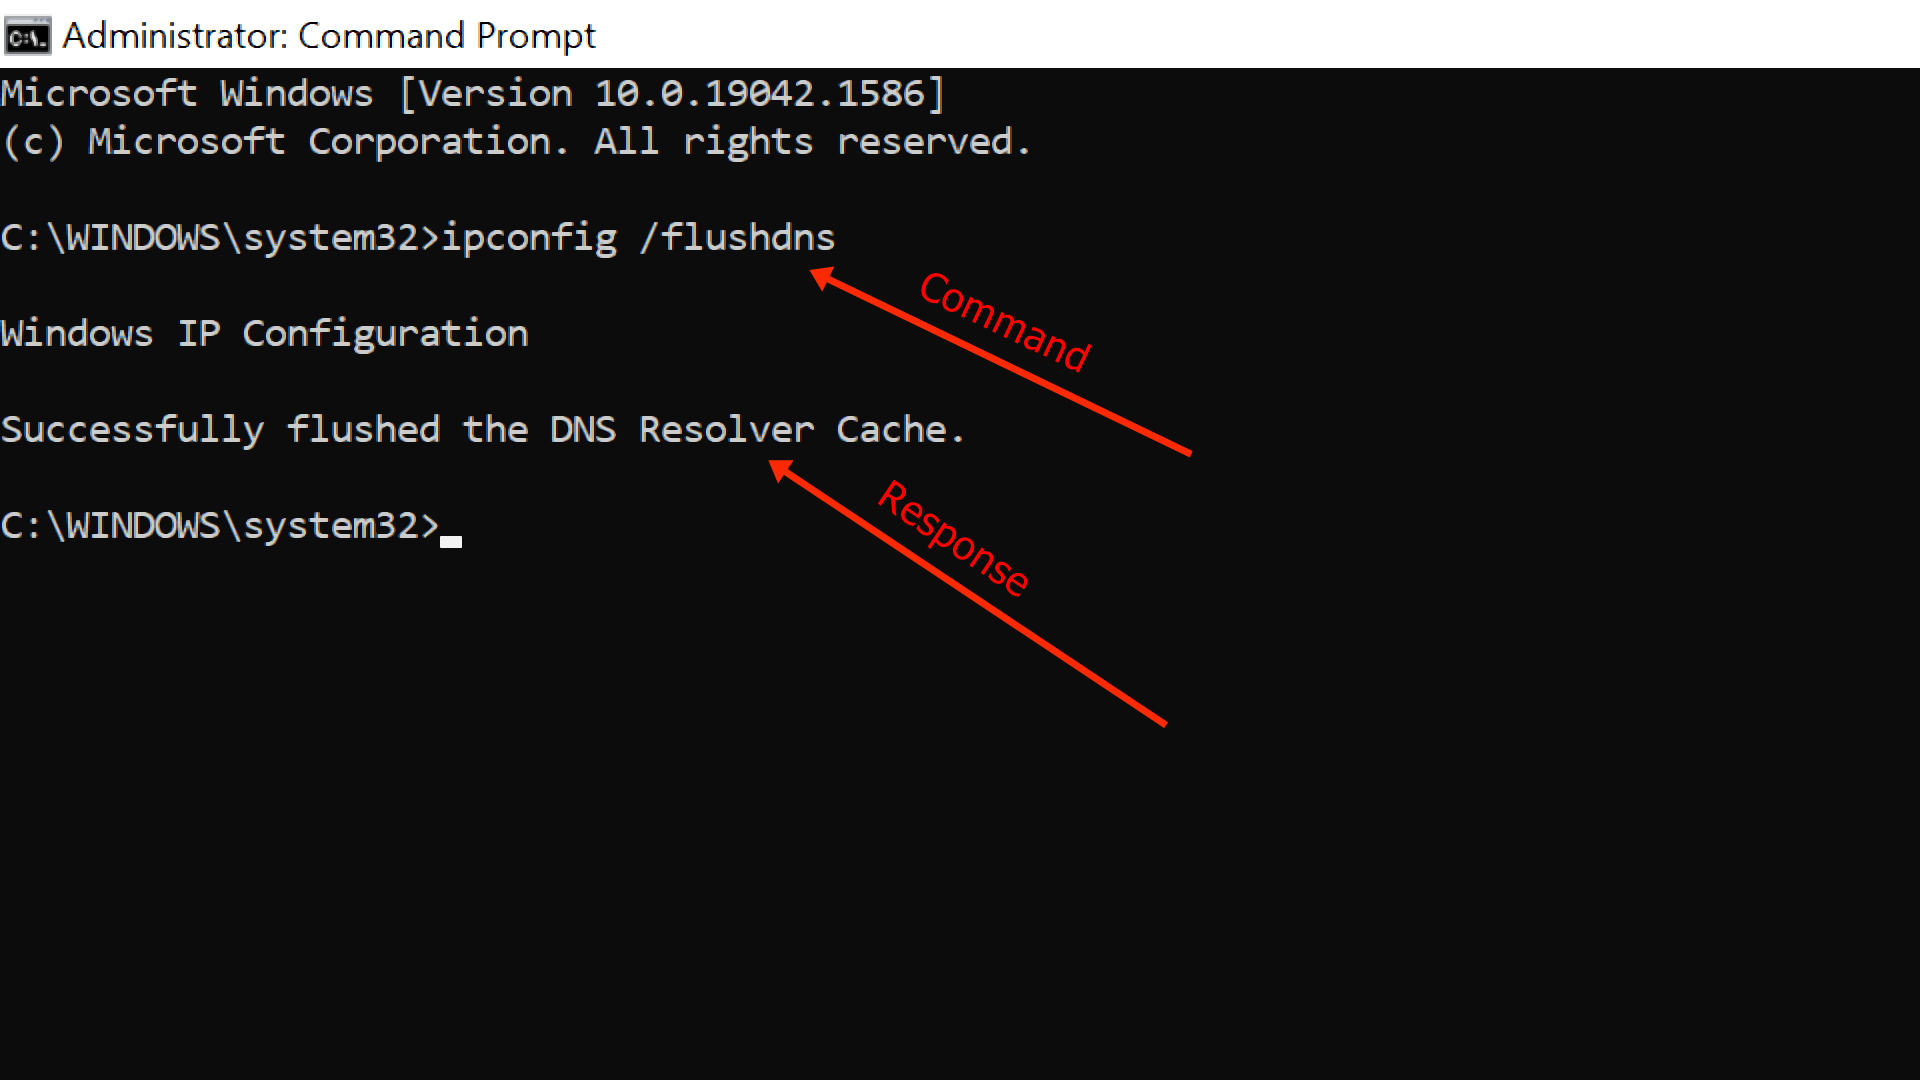
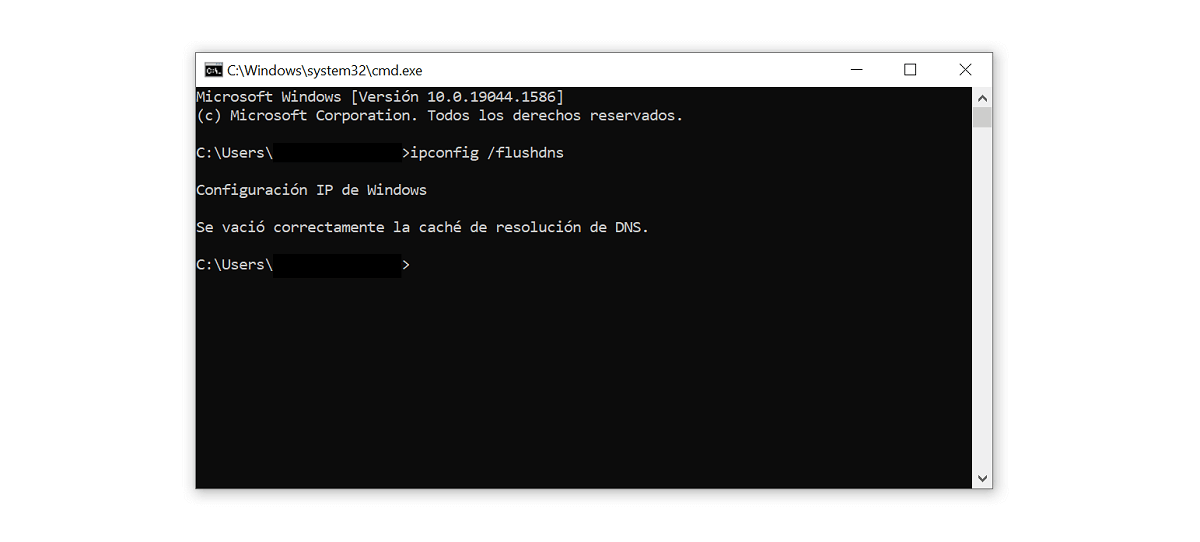
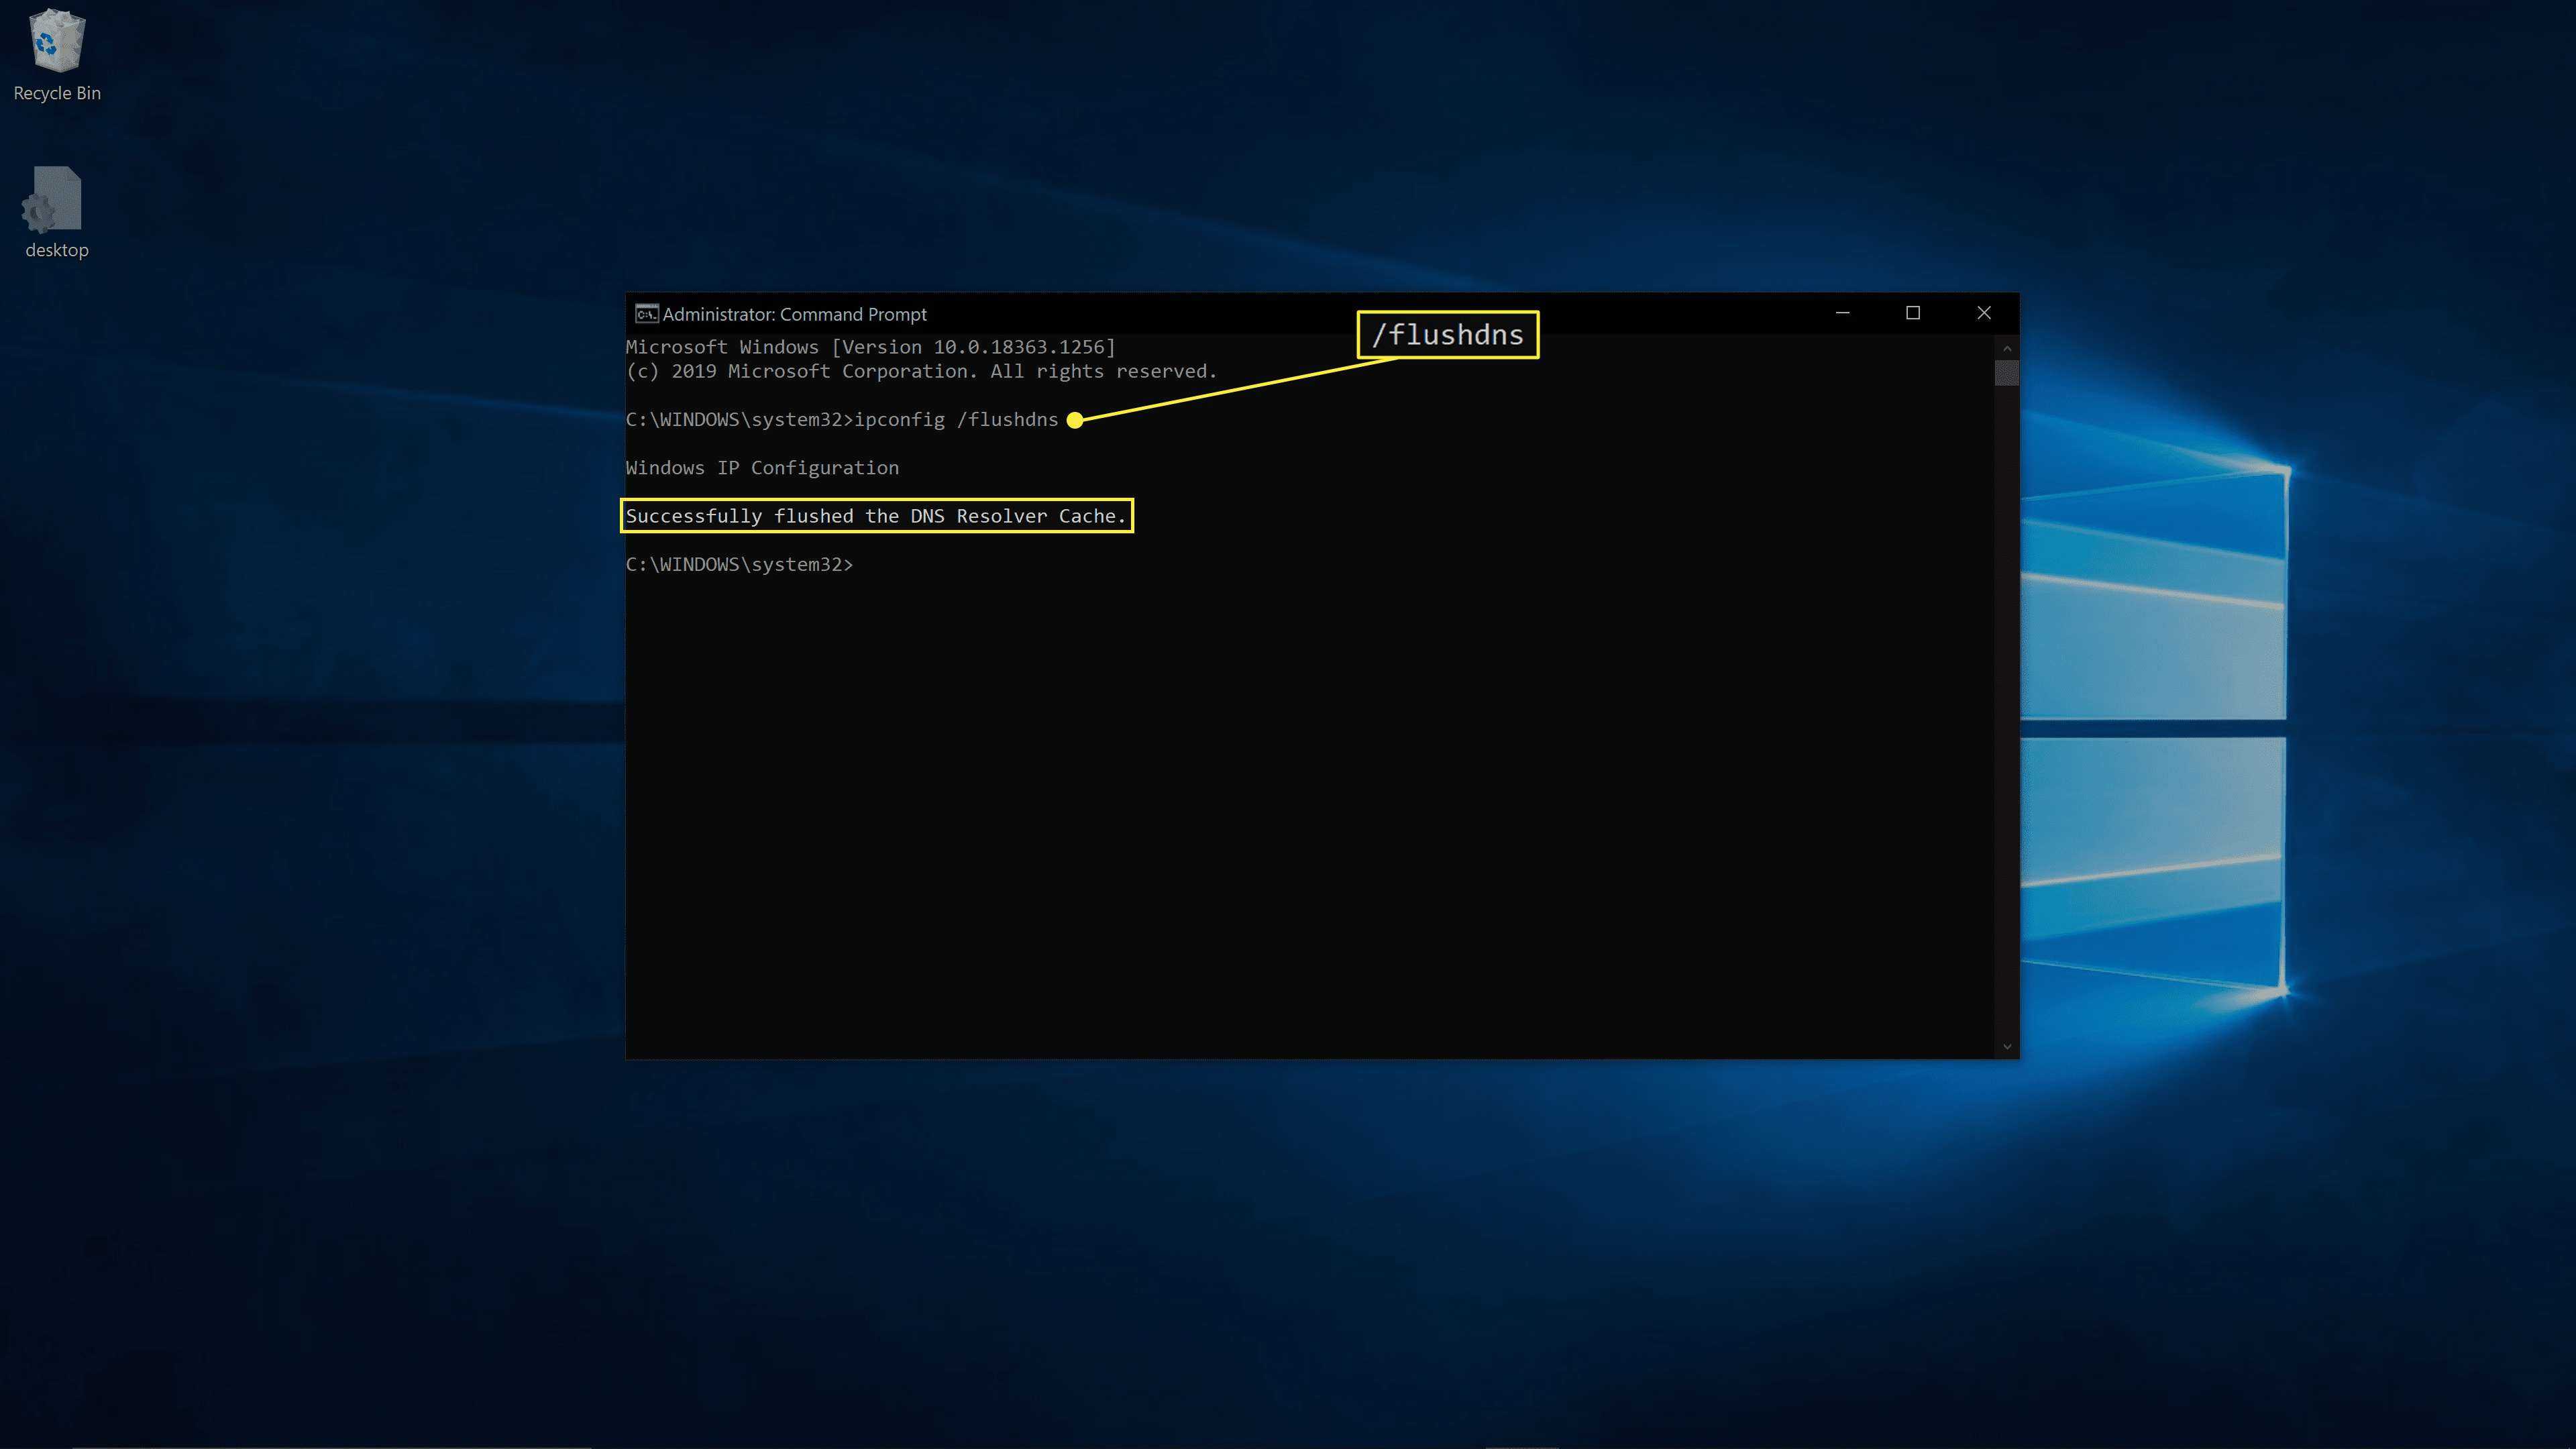
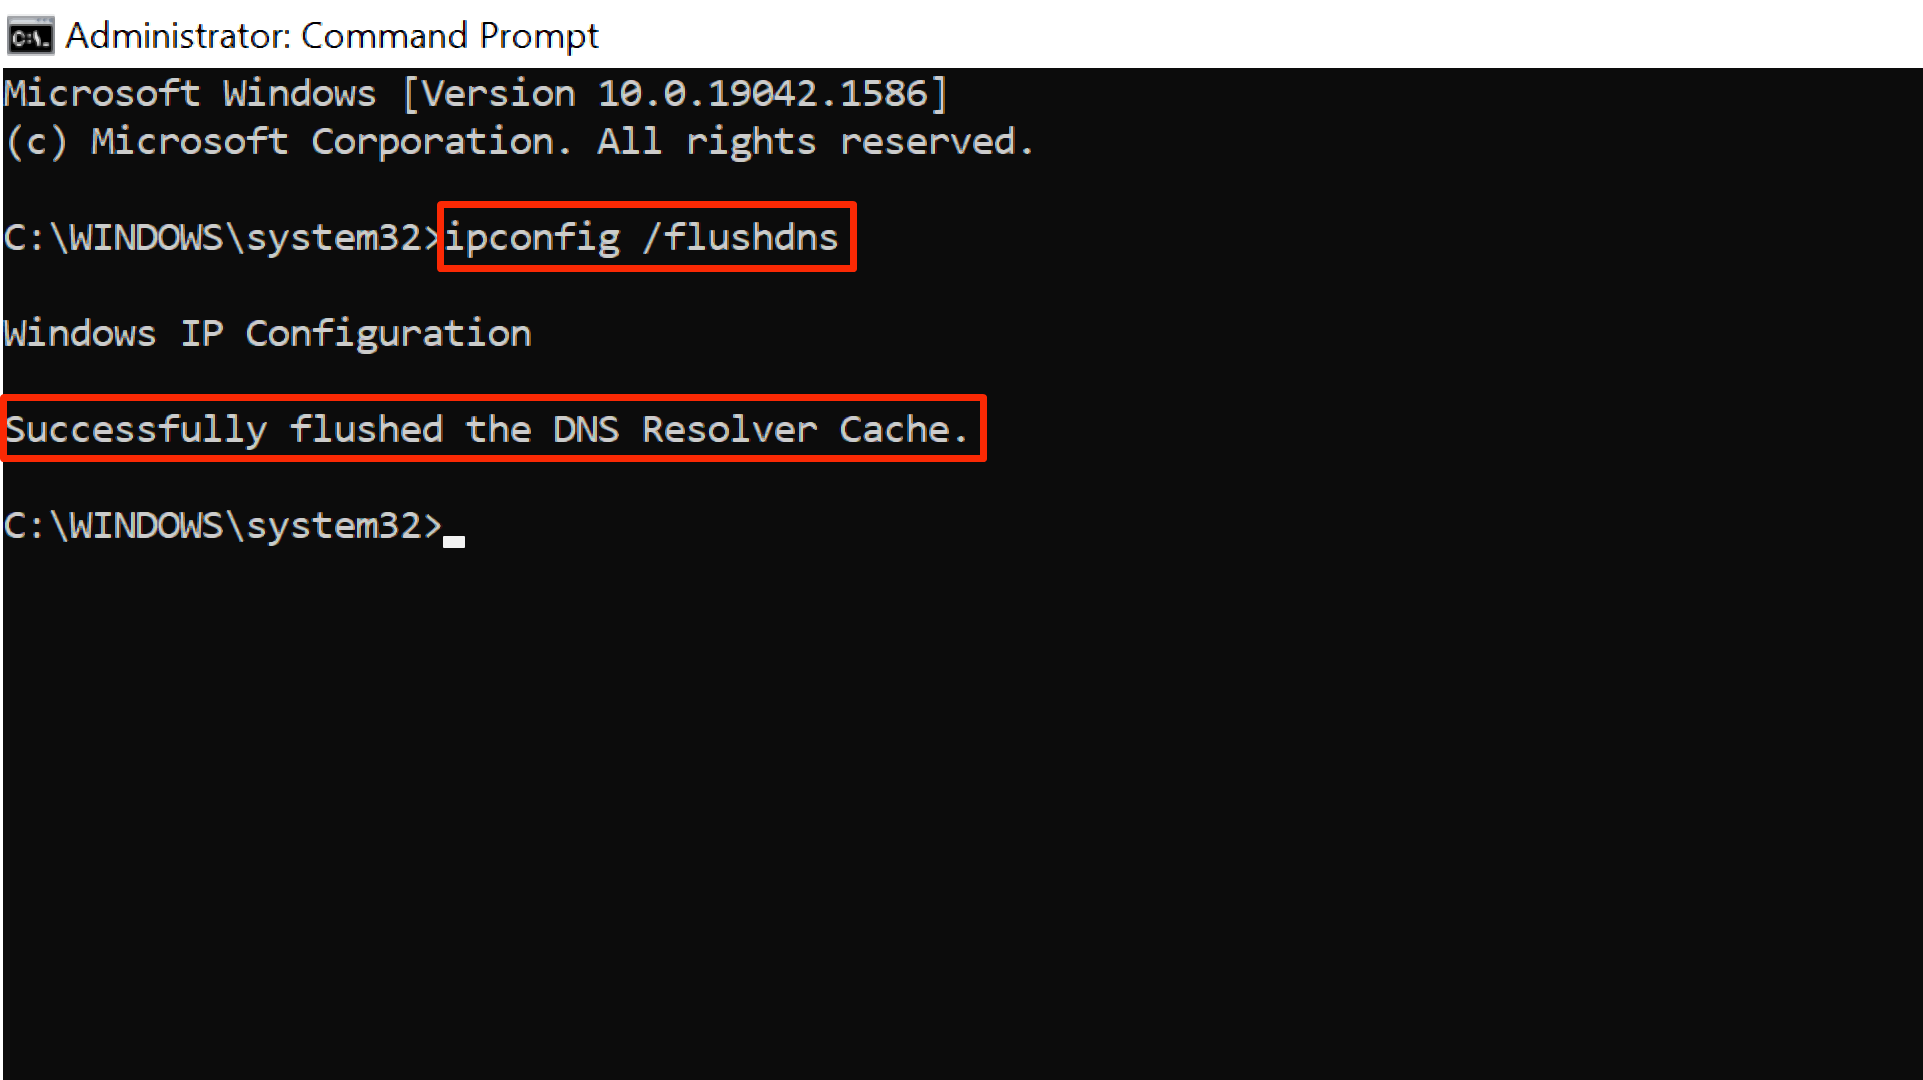
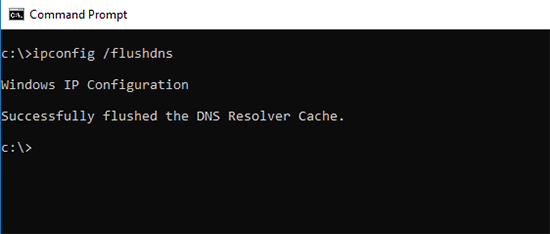
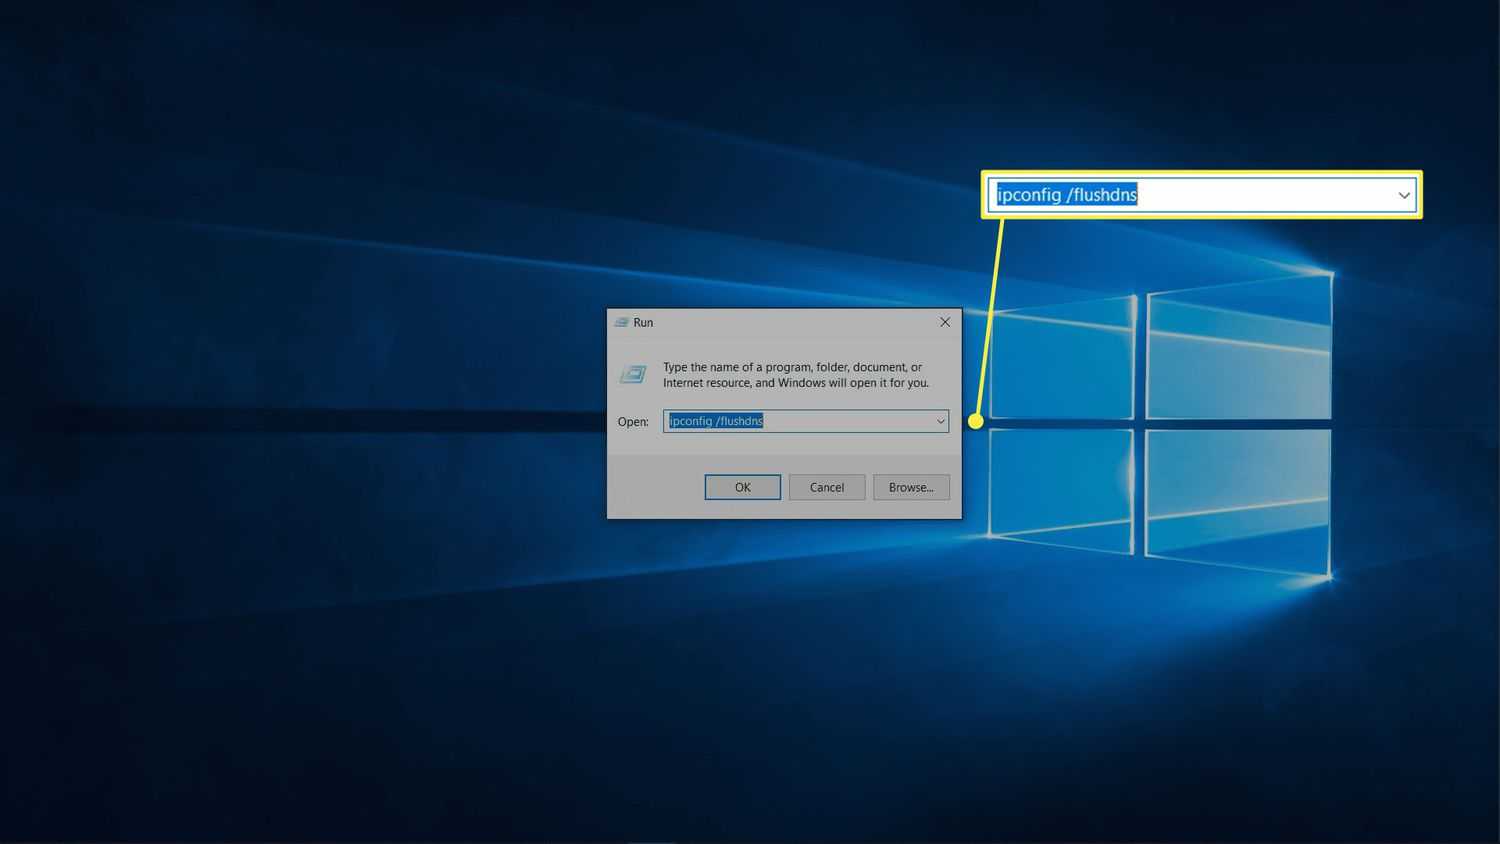
How do I flush DNS resolver cache on Windows?
Open Command Prompt as an administrator and type “ipconfig /flushdns.”
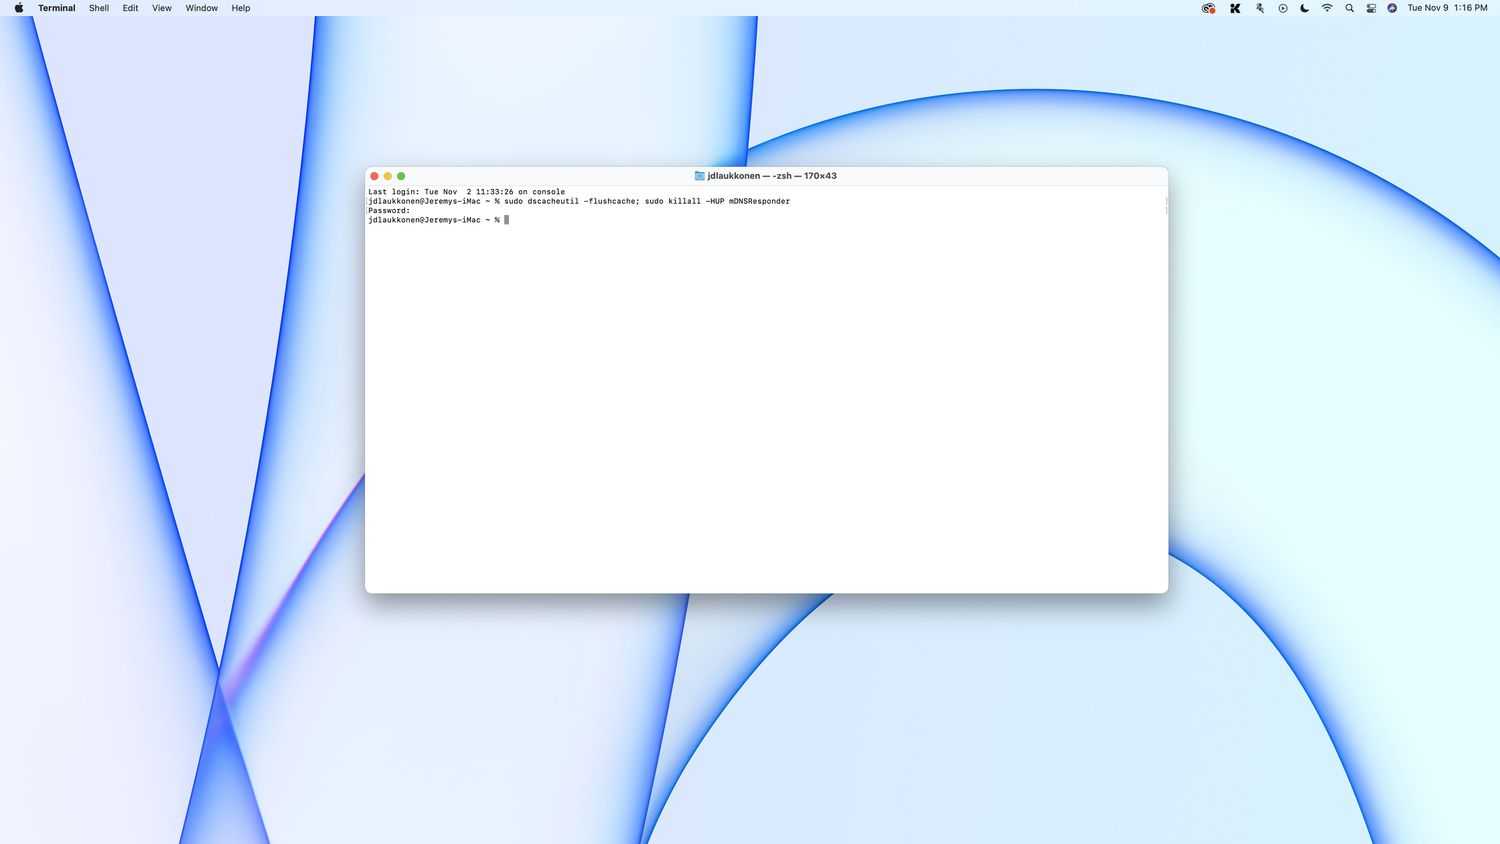
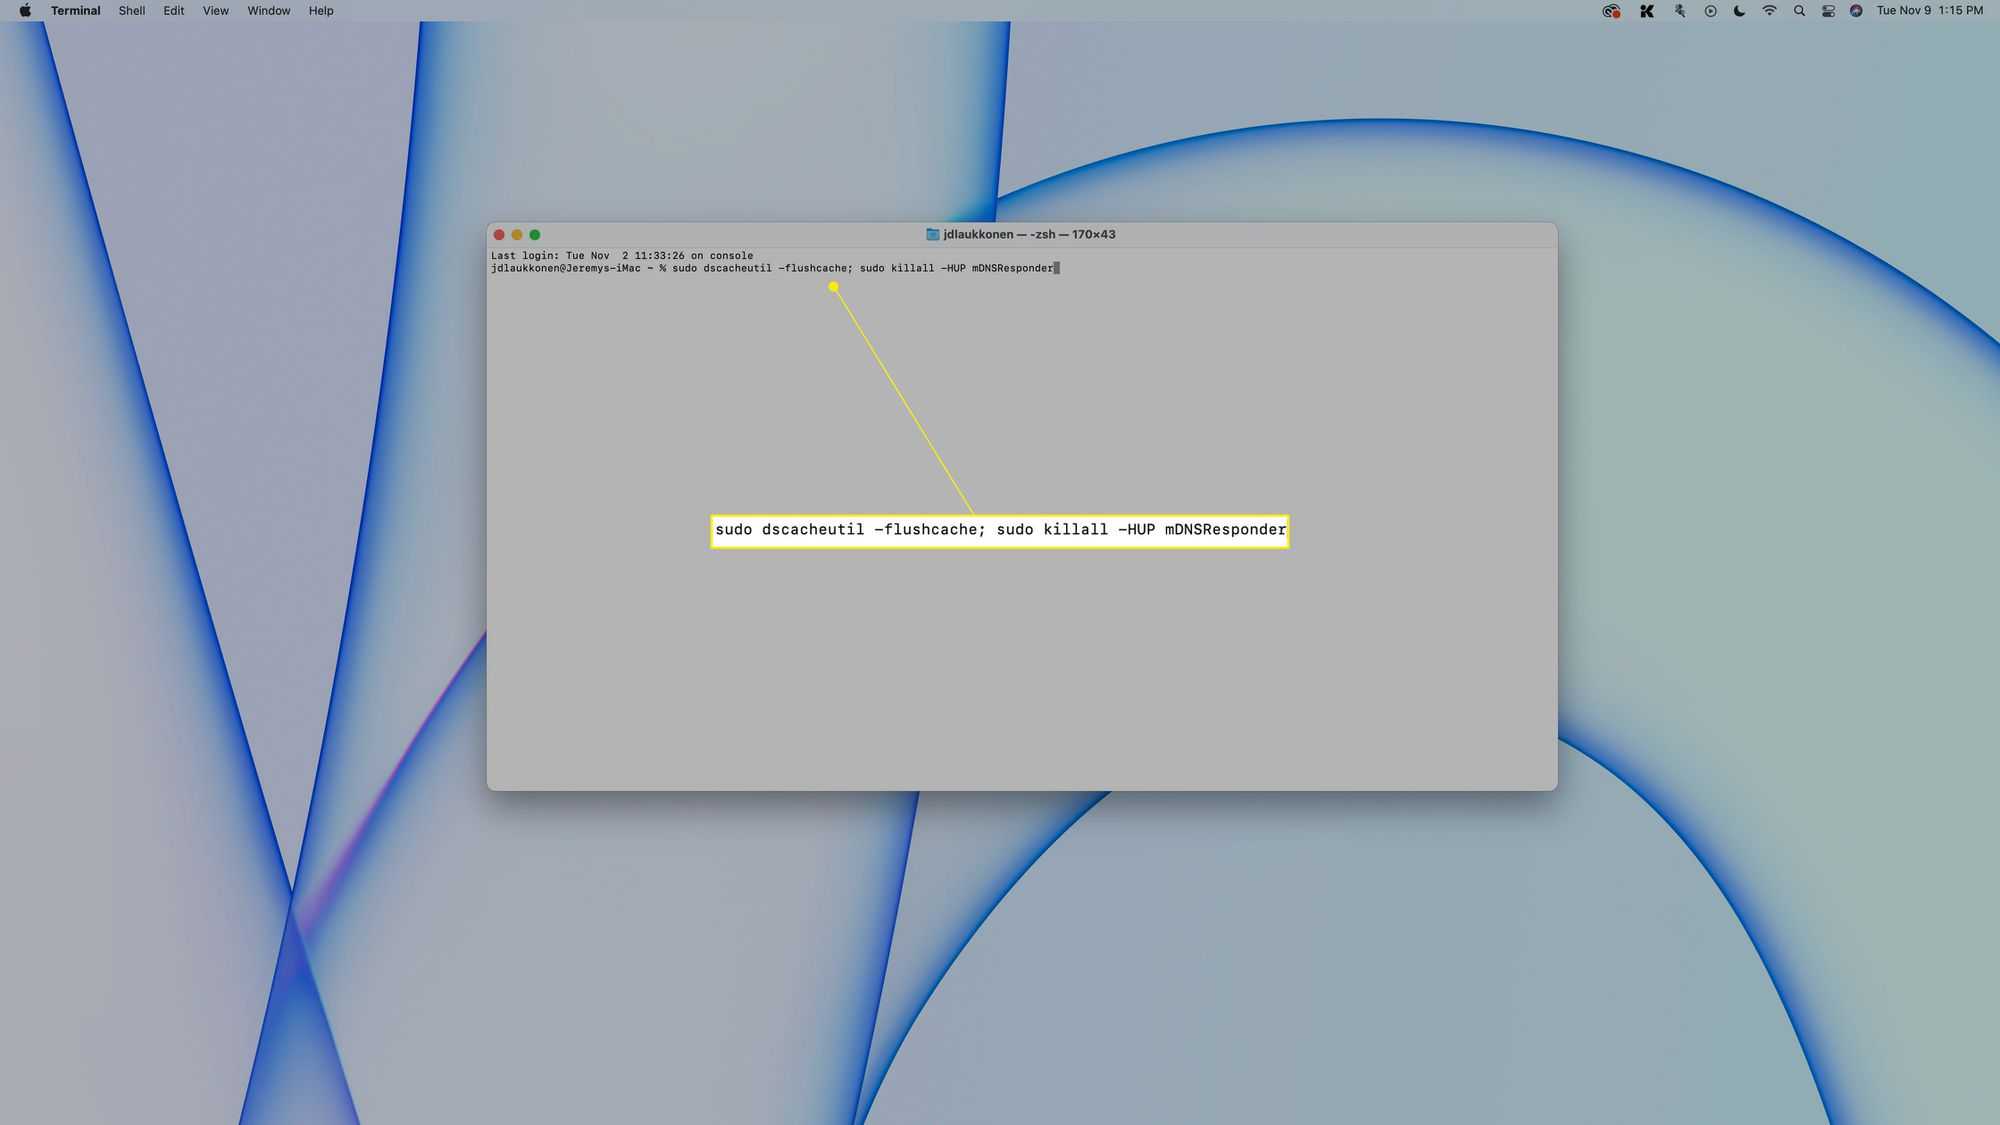
How do I flush DNS resolver cache on macOS?
Open Terminal, type “sudo dscacheutil -flushcache; sudo killall -HUP mDNSResponder,” and enter your admin password.
How do I flush DNS resolver cache on Linux?
Open a terminal and type “sudo systemd-resolve –flush-caches.”
Can I flush DNS resolver cache on my router?
Yes, but the process varies by router brand and model. Check the documentation for specific instructions.
Are there any downsides to flushing the DNS resolver cache?
No significant downsides. It might take a bit longer to resolve domain names temporarily after flushing.
Also, Read
- DNS_PROBE_FINISHED_NXDOMAIN Error Chrome (Solved)
- Solved: Microsoft Store Cache may be Damaged in Windows 10
- DNS Server not responding Error on Windows 11 or Windows 10
- What is a corrupted file and how to repair them in 2023
- Solved: Can’t Adjust Screen Resolution in Windows 10
Что делает очистка кеша DNS?
Кэш DNS может быть загроможден бесполезными записями или поврежден ошибочной информацией со временем, что приводит к значительному замедлению сетевого подключения и возникновению некоторых сетевых проблем.
Устройства периодически автоматически обновляют кеш и имя хоста. Однако веб-сайты не всегда остаются прежними, их домены или IP-адреса время от времени меняются, поэтому, если IP-адрес веб-сайта был изменен до обновления кеша DNS, существующие данные в кеше станут устаревшими и недействительными. Это также вызывает проблемы с подключением к веб-сайтам.
Очистка кеша DNS удаляет все IP-адреса или другие записи DNS из вашего кеша и, таким образом, заставляет ваш компьютер получать обновленные записи DNS с нуля. Это может помочь решить проблемы с подключением, неправильно отображаемый веб-контент и другие проблемы, а также повысить скорость и производительность вашего интернет-соединения.
Записи DNS часто становятся целью кибератак. Хакеры могут получить доступ к кешу DNS и измененным записям доменного имени для перенаправления трафика на поддельный веб-сайт, что называется спуфингом DNS или отравлением DNS. Таким образом, очистка или сброс кеша также важны из соображений безопасности.
Теперь, когда вы знаете основы кеширования DNS и то, что делает очистка, давайте посмотрим, как очистить кеш DNS в Windows 11.
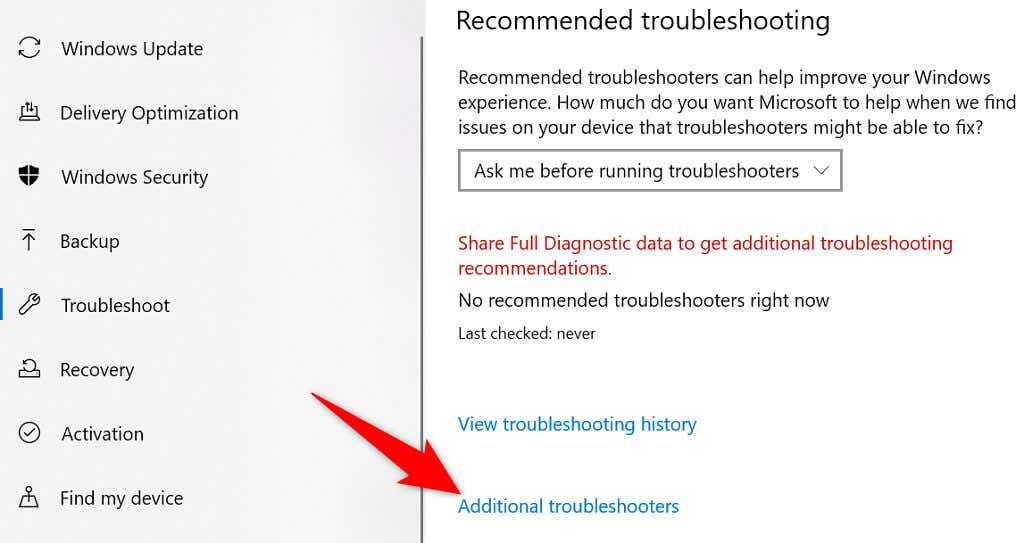
Что делать дальше
Простые решения не спасли — переходим к более сложным. Нужно будет залезть в настройки Windows и поменять пару настроек.
![[2 ways] how to setup dns on windows 11 step by step? - minitool](https://6msch59.ru/wp-content/uploads/0/5/4/054978d48a9fd665323dbaaa841fdec9.jpeg)
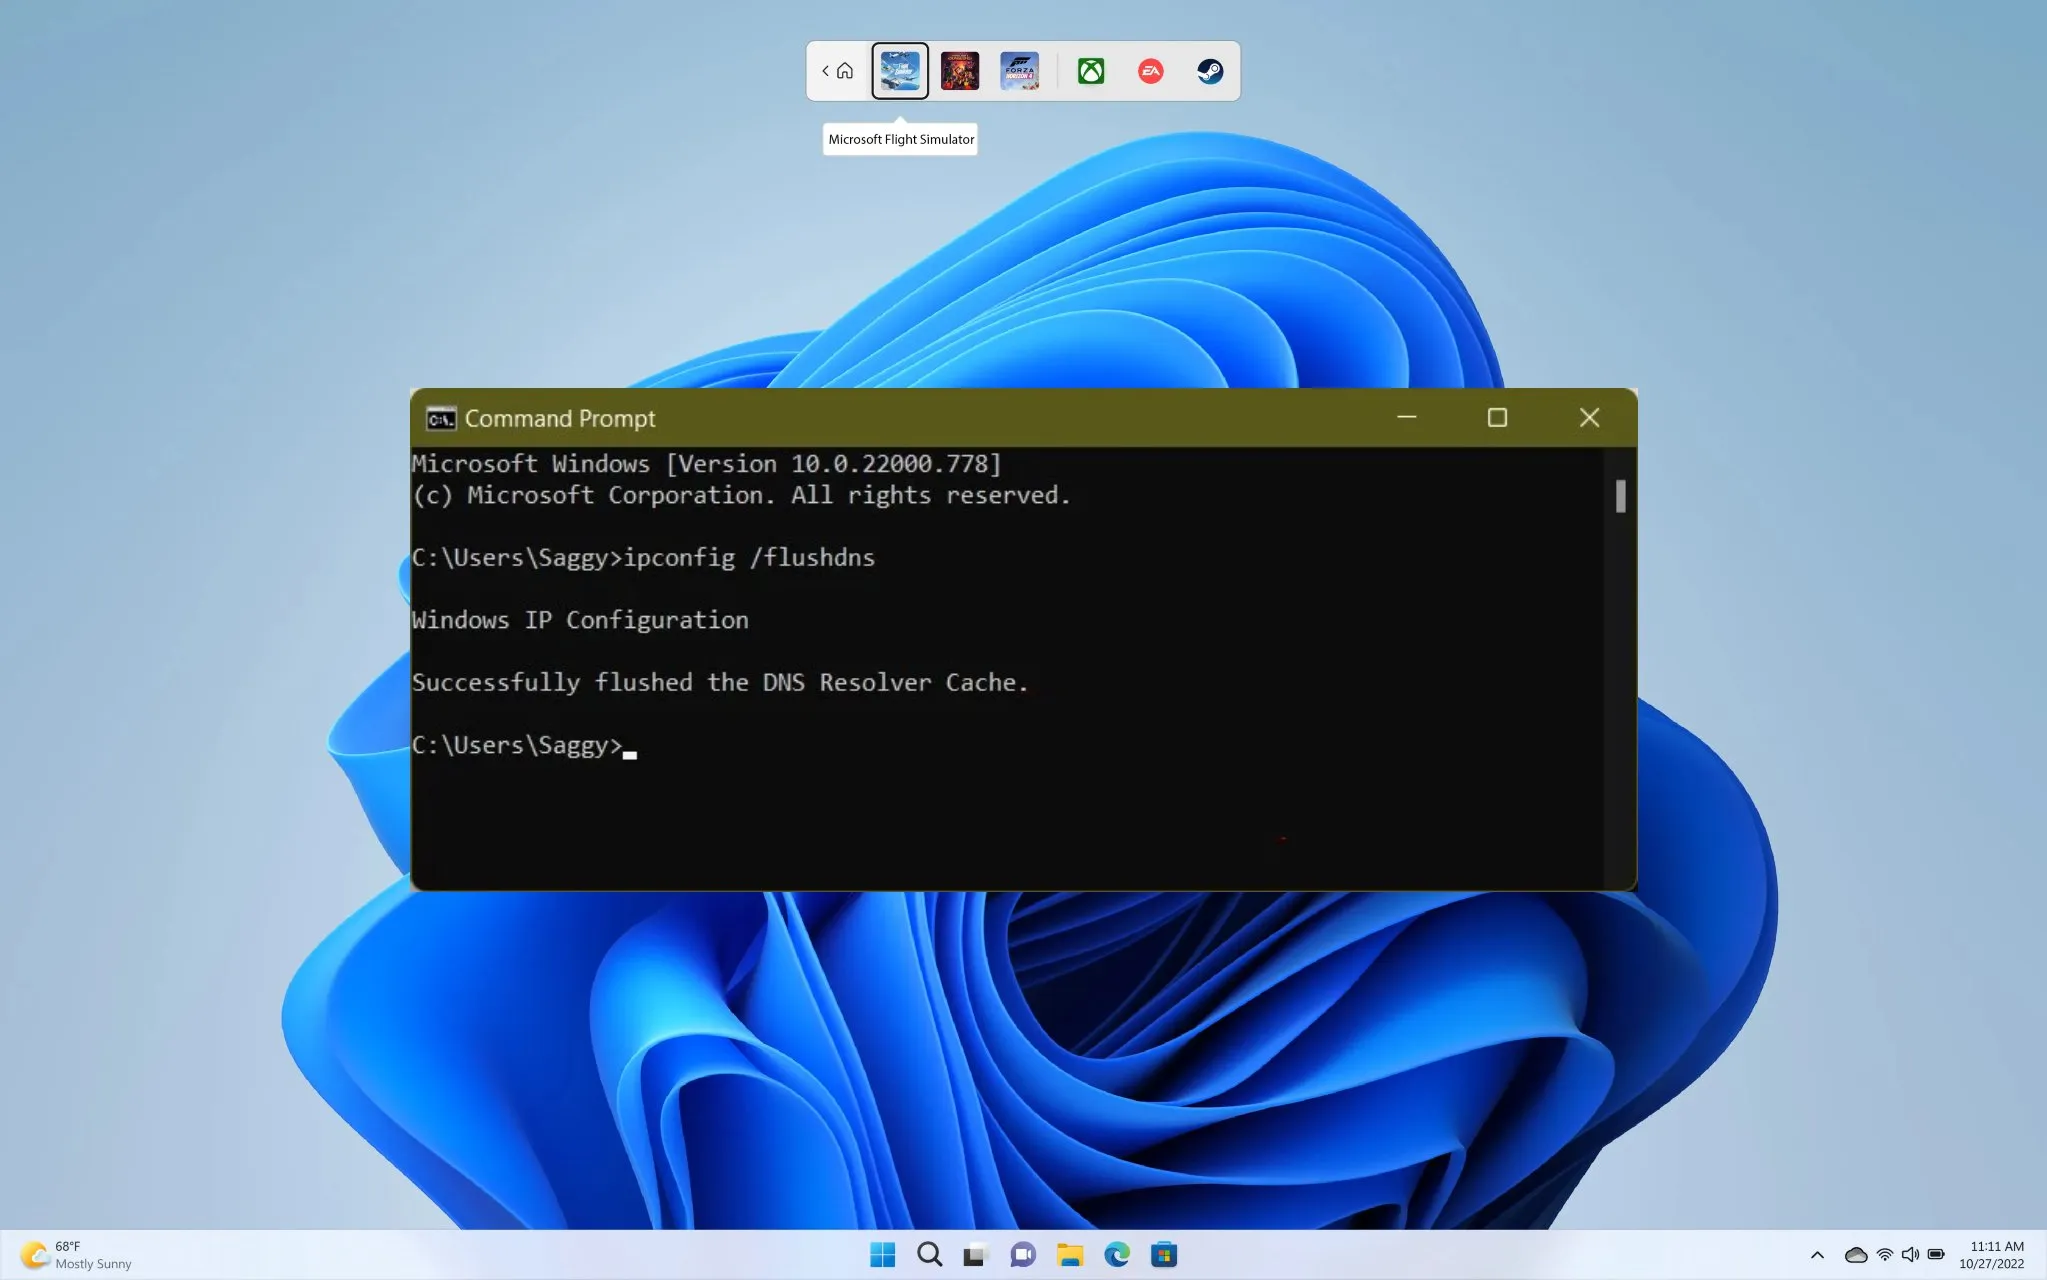
Очищаем кэш DNS-адресов. Нажимаем кнопку Win и вводим в поиске Командная строка. Находим её в открывшемся окне, щёлкаем правой кнопкой мыши и выбираем пункт Запуск от имени администратора.
Открылась командная строка. В ней нужно ввести следующие команды — по одной за раз:
![]()
Скриншот: Skillbox Media
Это должно очистить DNS-кэш. Если соединения всё ещё нет — переходим к следующему пункту.
Проверяем, работает ли DNS-клиент вообще. Нажимаем Win + R и вводим services.msc. В открывшемся окне нужно найти службу DNS-клиент и щёлкнуть на неё дважды.
![]()
Скриншот: Skillbox Media
Если служба работает нормально, она будет запущена и не даст себя отключить. Но если что-то не так — кнопка Запустить будет активна. Нажмите на неё и выберите тип запуска Автоматически, затем нажмите ОК и перезагрузите компьютер.
Настраиваем автоматический выбор DNS-серверов. Опять нажимаем кнопку Win и открываем Панель управления. Дальше нужно перейти в Сеть и Интернет → Центр управления сетями и общим доступом → Изменение параметров адаптера. Здесь находим активное подключение к интернету, щёлкаем по нему правой кнопкой мыши и выбираем Свойства.
![]()
Скриншот: Skillbox Media
В открывшемся окне нажмите на строчку IP версии 4 (TCP/IPv4) и выберите Свойства. Если в новом окне уже установлен DNS-сервер, то выберите пункт Получать адрес DNS-сервера автоматически.
![]()
Скриншот: Skillbox Media
Теперь жмём ОК, перезагружаем компьютер и проверяем соединение.
Устанавливаем DNS-сервер от Google. Это может и не сработать, потому что компания закрыла часть серверов в России, но попытаться стоит.
Переходим по тому же пути из предыдущего пункта: Панель управления → Сеть и Интернет → Центр управления сетями и общим доступом → Изменение параметров адаптера. Кликаем по активному подключению правой кнопкой мыши и выбираем Свойства. Теперь нажимаем на строчку IP версии 4 (TCP/IPv4) и выбираем Свойства.
В появившемся окне нужно активировать пункт Использовать следующие адреса DNS-серверов и указать два значения ниже:
- «Предпочитаемый DNS‑сервер»: 8.8.8.8
- «Альтернативный DNS‑сервер»: 8.8.4.4
![]()
Скриншот: Skillbox Media
Нажимаем ОК и перезагружаем компьютер.
Если не сработало, попробуйте установить эти же адреса в настройках роутера. Чтобы зайти в них, обычно нужно ввести в адресной строке браузера 192.168.0.0. У вас адрес может отличаться. На некоторых роутерах его можно найти на нижней крышке, поэтому сразу загляните туда.
В настройках находим раздел, связанный с DNS, и ищем адреса для DNS-серверов. Выглядит это примерно так:
![]()
Это админ-панель для роутера Xiaomi. В ней нужно перейти в Settings → Network Settings и найти раздел Network settingsСкриншот: Skillbox Media
Подставляем те же значения:
- «Предпочитаемый DNS‑сервер»: 8.8.8.8
- «Альтернативный DNS‑сервер»: 8.8.4.4
Как исправить «DNS сервер не отвечает»?
Для того, чтобы испрвить ошибку DNS сервера, который отвечает за переходы по веб-адресам в интернете, можно воспользоваться рядом способов:
- Перезагрузить компьютер (ноутбук) или wifi роутер. Возможно, после этого вопрос решится сам собой
- Проверить систему антивирусом — многие вредоносные программы блокируют свободный выход в интернет, прогоняя компьютер через свои собственные серверы, для кражи данных или использования ресурсов вашего компьютера в мошеннических схемах
- Если антивирус или файрвол наоборот работают, то попробуйте на время отключить брандмауэр на WindowsPN. Возможно, он пропускает трафик через свои собственные DNS сервера, которые временно не отвечают из-за профилактических работ или технической неисправности.
- Очистить сетевые настройки Windows, после чего заново подключиться к интернету или беспроводной сети
- Сменить DNS серверы на роутере или компьютере в самой ОС Windows
Универсальные способы, подходящие для любого устройства
Перезагрузите систему
В любой непонятной ситуации с ошибками в первую очередь нужно перезагрузить систему. Этот трюк и кэш оперативной памяти очистит, и неверные настройки сбросит, и правильно загрузит все драйверы.![]()
Смените браузер
Проблема может заключаться в вашем браузере. Например, из-за отсутствия обновлений или ошибок в программной оболочке. Чтобы проверить эту гипотезу, запустите другой браузер и попытайтесь открыть нужную вам страницу сайту. Если вы ранее использовали Mozilla Firefox, то попробуйте запуститься с Microsoft Edge, а если Safari, то попробуйте Google Chrome, – в общем любой другой браузер, который надежно работает.
Если этот прием сработал, то теперь вам нужно будет разобраться со своим браузером: попробуйте установить последние обновления или удалить и заново установить приложение. Если же нет – то, двигаемся дальше.
Перезагрузите роутер
Кэш вашего маршрутизатора должен очищаться автоматически, но иногда это не происходит. Тогда нужно будет выполнить эту процедуру вручную. Для очистки кэша просто перезагрузите роутер.
В большинстве моделей на корпусе маршрутизатора располагается специальная кнопка перезагрузки, но иногда такой кнопкой может выступать и кнопка питания. В любом случае лучше обратиться к инструкции к оборудованию, чтобы узнать как выполнить перезагрузку. Если не можете с этим разобраться, тогда просто выдерните штекер питания на 30-40 секунд, а затем вновь подключите.
Теперь вновь проверьте — не исчезла ли ошибка с подключением «DNS сервер не отвечает».
Смена DNS серверов на Windows 11
Итак, поменять адреса DNS серверов можно как для всей локальной сети в параметрах роутера, так и для каждого отдельного устройства. Начнем с простого — с одного ноутбука. У меня установлена операционная система Windows 11, поэтому буду показывать на ее примере. Здесь тоже есть два типа настроек:
- Мы можем задать вручную DNS сервера по типу подключения компьютера к интернету — по WiFi или кабелю. В этом случае задаются единые настройки для всех соединений данного типа. То есть, где-бы мы не подключились к беспроводному сигналу, везде будут применяться указанные нами DNS
- Также есть возможность прописать DNS только для одного конкретного сетевого SSID. Например, только для домашнего интернета. В остальных же случаях сервера будут получаться автоматически от маршрутизатора или оборудования на стороне провайдера
Для всех сетей
-
Для того, чтобы установить стороннее DNS соединение для всех подключений, необходимо сначала попасть в сетевые настройки. Для этого наводим курсор на иконку «WiFi» в панели значков Windwos и кликаем по нему правой кнопкой мыши и выбираем «Параметры сети и интернета»
-
Далее заходим в меню «Беспроводная сеть»
-
И выбираем «Посмотреть дополнительные свойства»
-
Откроется страница с описанием текущей конфигурации подключения к роутеру. Нам нужно нажать на кнопку «Изменить» в строке «Назначение DNS-сервера»
-
В новом окне меняем «Автоматически» на «Вручную»
-
Активируем «IPv4»
- И прописываем в два поля (DNS-1 и DNS-2) адреса публичных DNS серверов от Google:
- 8.8.8.8
- 8.8.4.4
-
В том случае, если система Windows выдает ошибку «IPv6 без доступа к сети интернет«, то можно также активировать соответствующий переключатель и вписать еще один адрес DNS сервера от Гугла — «2001:4860:4860::8888» или «2001:4860:4860::8844»
-
Результат изменений можно увидеть на информационной странице
Для отдельного Wi-Fi
Как я уже упоминал выше, применение одинаковых настроек сразу для всех сетей может сделать недоступным подключение к интернету через некоторые из них. Поэтому если вы часто пользуетесь ноутбуком в кафе или общестенном транспорте, имеет смысл поменять DNS сервера для отдельных SSID. Например, для домашнего интернета.
Для этого заходим в настройки беспроводной сети и нажимаем на название текущего подключения
Привлекающая внимание строка оповещает о том, Что сейчас к данной сети применены общие правила с инзменеными адресами серверов. Для установки здесь инживидуальных значений жмем на кнопку «Изменить»
Опять выбираем «Вручную»
Включаем «IPv4» и «IPv6»
И вводим нужные данные от Google Public DNS
Включить DNS поверх HTTPS в Windows 11
- Откройте приложение «Параметры», нажав клавиши Win + I.
- Откройте страницу Сеть и Интернет.
- Справа нажмите на сетевое подключение, например Wi-Fi или Ethernet.
- На следующей странице нажмите кнопку «Изменить» в разделе «Назначение DNS-сервера».
- В раскрывающемся списке вверху страницы выберите «Вручную».
- Укажите адреса DNS-серверов, которые поддерживают DoH, используя приведенную ниже справочную таблицу.
- Выберите «Только зашифрованные» (DNS поверх HTTPS) в раскрывающихся меню «Предпочтительное шифрование DNS» и «Альтернативное шифрование DNS».
- Если ваше соединение поддерживает IPv6, повторите предыдущие шаги для его настройки.
- Наконец, нажмите кнопку «Сохранить».
Готово! Чтобы проверить, действительно ли функция DoH работает на вашем устройстве, прокрутите вниз содержимое страницы Сеть и Интернет> Свойства. Вы должны увидеть «Зашифровано» рядом со значением адреса DNS.
![]()
Вы можете использовать следующие общедоступные DNS-серверы поверх HTTPS-серверов.
Список публичных DNS-серверов, поддерживающих DoH
| Владелец сервера | IPv4 адреса | IPv6 адреса |
| Cloudflare | 1.1.1.1
1.0.0.1 |
2606:4700:4700::1111
2606:4700:4700::1001 |
| 8.8.8.8
8.8.4.4 |
2001:4860:4860::8888
2001:4860:4860::8844 |
|
| Quad9 | 9.9.9.9
149.112.112.112 |
2620:fe::fe
2620:fe::fe:9 |
Альтернативный метод — включить DoH в реестре. Используйте его, если по какой-либо причине вышеуказанный метод не работает или приложение «Настройки» не работает в вашем сеансе.
Включаем DNS поверх HTTPS в реестре
- Нажмите Win + R, введите regedit в поле «Выполнить» и нажмите Enter.
- В редакторе реестра перейдите по следующему пути .
- Справа измените или создайте новое 32-битное значение DWORD EnableAutoDoh. Установите его значение равным 2.
- Перезагрузите Windows 11.
Это активирует DNS поверх HTTPS, и теперь Windows будет отправлять и получать DNS-трафик через безопасные зашифрованные серверы. Однако вам необходимо указать правильный адрес DNS-сервера, адрес которого можно взять из таблицы выше.
Вот как вы можете изменить адрес DNS-сервера в Windows 11 без использования приложения «Параметры».
Как изменить адрес DNS сервера после включения DoH
- Нажмите Win + R и введите в поле «Выполнить», затем нажмите Enter. Откроется классическая Панель управления.
- Перейдите в Панель управления \ Сеть и Интернет \ Центр управления сетями и общим доступом.
- Справа нажмите «Изменить свойства адаптера».
- Откроется диалоговое окно «Сетевые подключения». Дважды щелкните ваше сетевое подключение.
- В следующем окне щелкните Свойства.
- В свойствах адаптера выберите Интернет-протокол версии 4 (TCP / IPv4) (Internet Protocol Version 4 (TCP/IPv4)) и нажмите кнопку «Свойства».
- Выберите вариант «Использовать следующие адреса DNS-серверов:» на вкладке «Общие». Введите адрес DNS-сервера, поддерживающего DoH, из таблицы выше.
- Если ваша сеть также работает через IPv6, укажите серверы IPv6 для параметра Протокол Интернет версии 6 (TCP / IPv6).
- Щелкните ОК, чтобы применить сделанные настройки.
На этом всё!
Узнавайте о новых статьях быстрее. Подпишитесь на наши каналы в Telegram и .
Судя по тому, что вы читаете этот текст, вы дочитали эту статью до конца. Если она вам понравилась, поделитесь, пожалуйста, с помощью кнопок ниже. Спасибо за вашу поддержку!
Вы здесь:
Главная страница » Windows » Windows 11 » Как включить DNS поверх HTTPS в Windows 11 (DoH)
FAQ
Whenever you visit a website using its domain name (i.e. microsoft.com), your browser is directed to a DNS server where it learns the IP address of that website. You are then directed to that website. A record of the IP address that the domain name points to is created within Windows so that if you visit that same website again, the information is accessed quicker. These records that get created make up the DNS Resolver Cache.
Sometimes an IP address to a site may change. If the DNS Resolver Cache has the old IP address record, it may result in your computer not being able to reach the site. Cached data can also become corrupt. Therefore, clearing it is a step you can take whenever you cannot connect to a site.

Yes, you can. From a Command Prompt, you can use the following command to view the data in the DNS resolver cache:
ipconfig /displaydns
![]()
How to get the DNS client cache
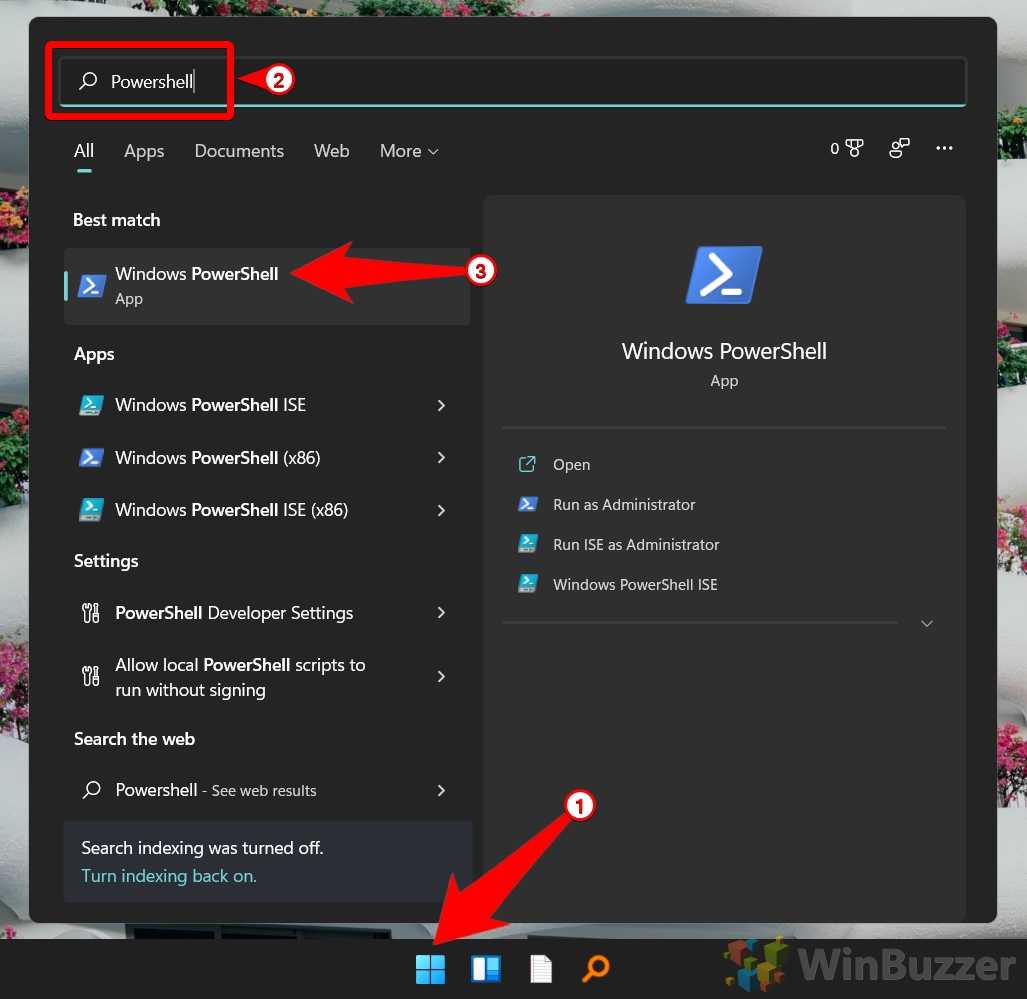
Alternatively, you can use the Microsoft PowerShell terminal on Windows 11 or 10 computer and execute the following code in it to view the data stored in your Windows PC’s DNS resolver cache:
Get-DnsClientCache
Как исправить ошибку «DNS-сервер не отвечает» в Windows 11
Есть много причин, по которым вы можете столкнуться с такой ошибкой. В большинстве случаев компьютер не может установить подключение к Интернету. Иногда Windows ошибочно идентифицирует проблемы, связанные с сетью, как проблемы с DNS, хотя в некоторых случаях они вызваны сторонним приложением, мешающим вашему соединению.
Какой бы ни была причина, вы можете попробовать приведенные ниже исправления, чтобы устранить ошибку «DNS-сервер не отвечает» в Windows 11.
Важное напоминание: Прежде чем приступать к каким-либо исправлениям, убедитесь, что у вас есть работающее подключение к Интернету. Как упоминалось ранее, это обычно вызвано проблемами, связанными с сетью, поэтому лучше сразу исключить эту причину
Если у вас есть проблемы с Интернетом, сначала устраните их, прежде чем выполнять все эти шаги.
Проверять Как узнать и обнаружить свои проблемы с Интернетом и легко их исправить.
What Is Flush DNS and What Does It Do?
Flush DNS is a common Command Prompt code for all modern Windows operating systems since Windows 2000. You can use this code to force the Windows PC to clear the records in its DNS resolver cache. Operating system developers allow the users to do this manually to avoid data security issues, website loading problems, and other DNS address-related issues.
After you use the Flush DNS command, Windows wipes the entire DNS cache that it built since the recent clean installation of Windows 11 or any other Windows operating system. The web browsers from now on need to send a DNS resolver query to the nearest DNS server to get the latest IP of the URL you’re trying to access. Soon, Windows 11 will record these resolved IPs in the local DNS resolver cache.
Why flush DNS cache on your Windows 11?
Apart from the obvious benefit of having a relevant website cache and speedy internet navigation, there are two other important reasons why you should flush your DNS cache from time to time. The first is privacy. Sure, DNS doesn’t store information the way your browser cookies do. But it does contain information about the websites that you’ve visited recently and those that you visit regularly. This means that if someone gets access to your DNS cache, your privacy could be compromised.
The other reason is basic security. If cybercriminals get access to your DNS cache, they can change the IP addresses of websites stored there and even insert new ones. Also called DNS poisoning, this can be quite a security problem. If cybercriminals can redirect you to another website, they can gather your sensitive data such as passwords to your accounts and credit card information.
Clearing the DNS cache will ensure that all the irrelevant and obsolete information about websites is removed, and your internet browsing remains secure.
So these were the ways that you can flush DNS cache on Windows 11. Doing so is a harmless little thing, but one that can save you from a world of trouble, secure your privacy, and of course, speed up your website navigation.
RELATED
- How to Install Fonts on Windows 11
- How to Get Rid Of Microsoft Edge on Windows 11
- How to Install PIP on Windows 11
- How to Change a Wallpaper on Windows 11
- How to Get Rid Of Microsoft Teams Chat From Taskbar on Windows 11
Change DNS servers on Windows 11 from Command Prompt
The quickest way to change the DNS servers on Windows 11 is using Command Prompt, even though typing commands isn’t for everyone.
To change the DNS address with Command Prompt, use these steps:
-
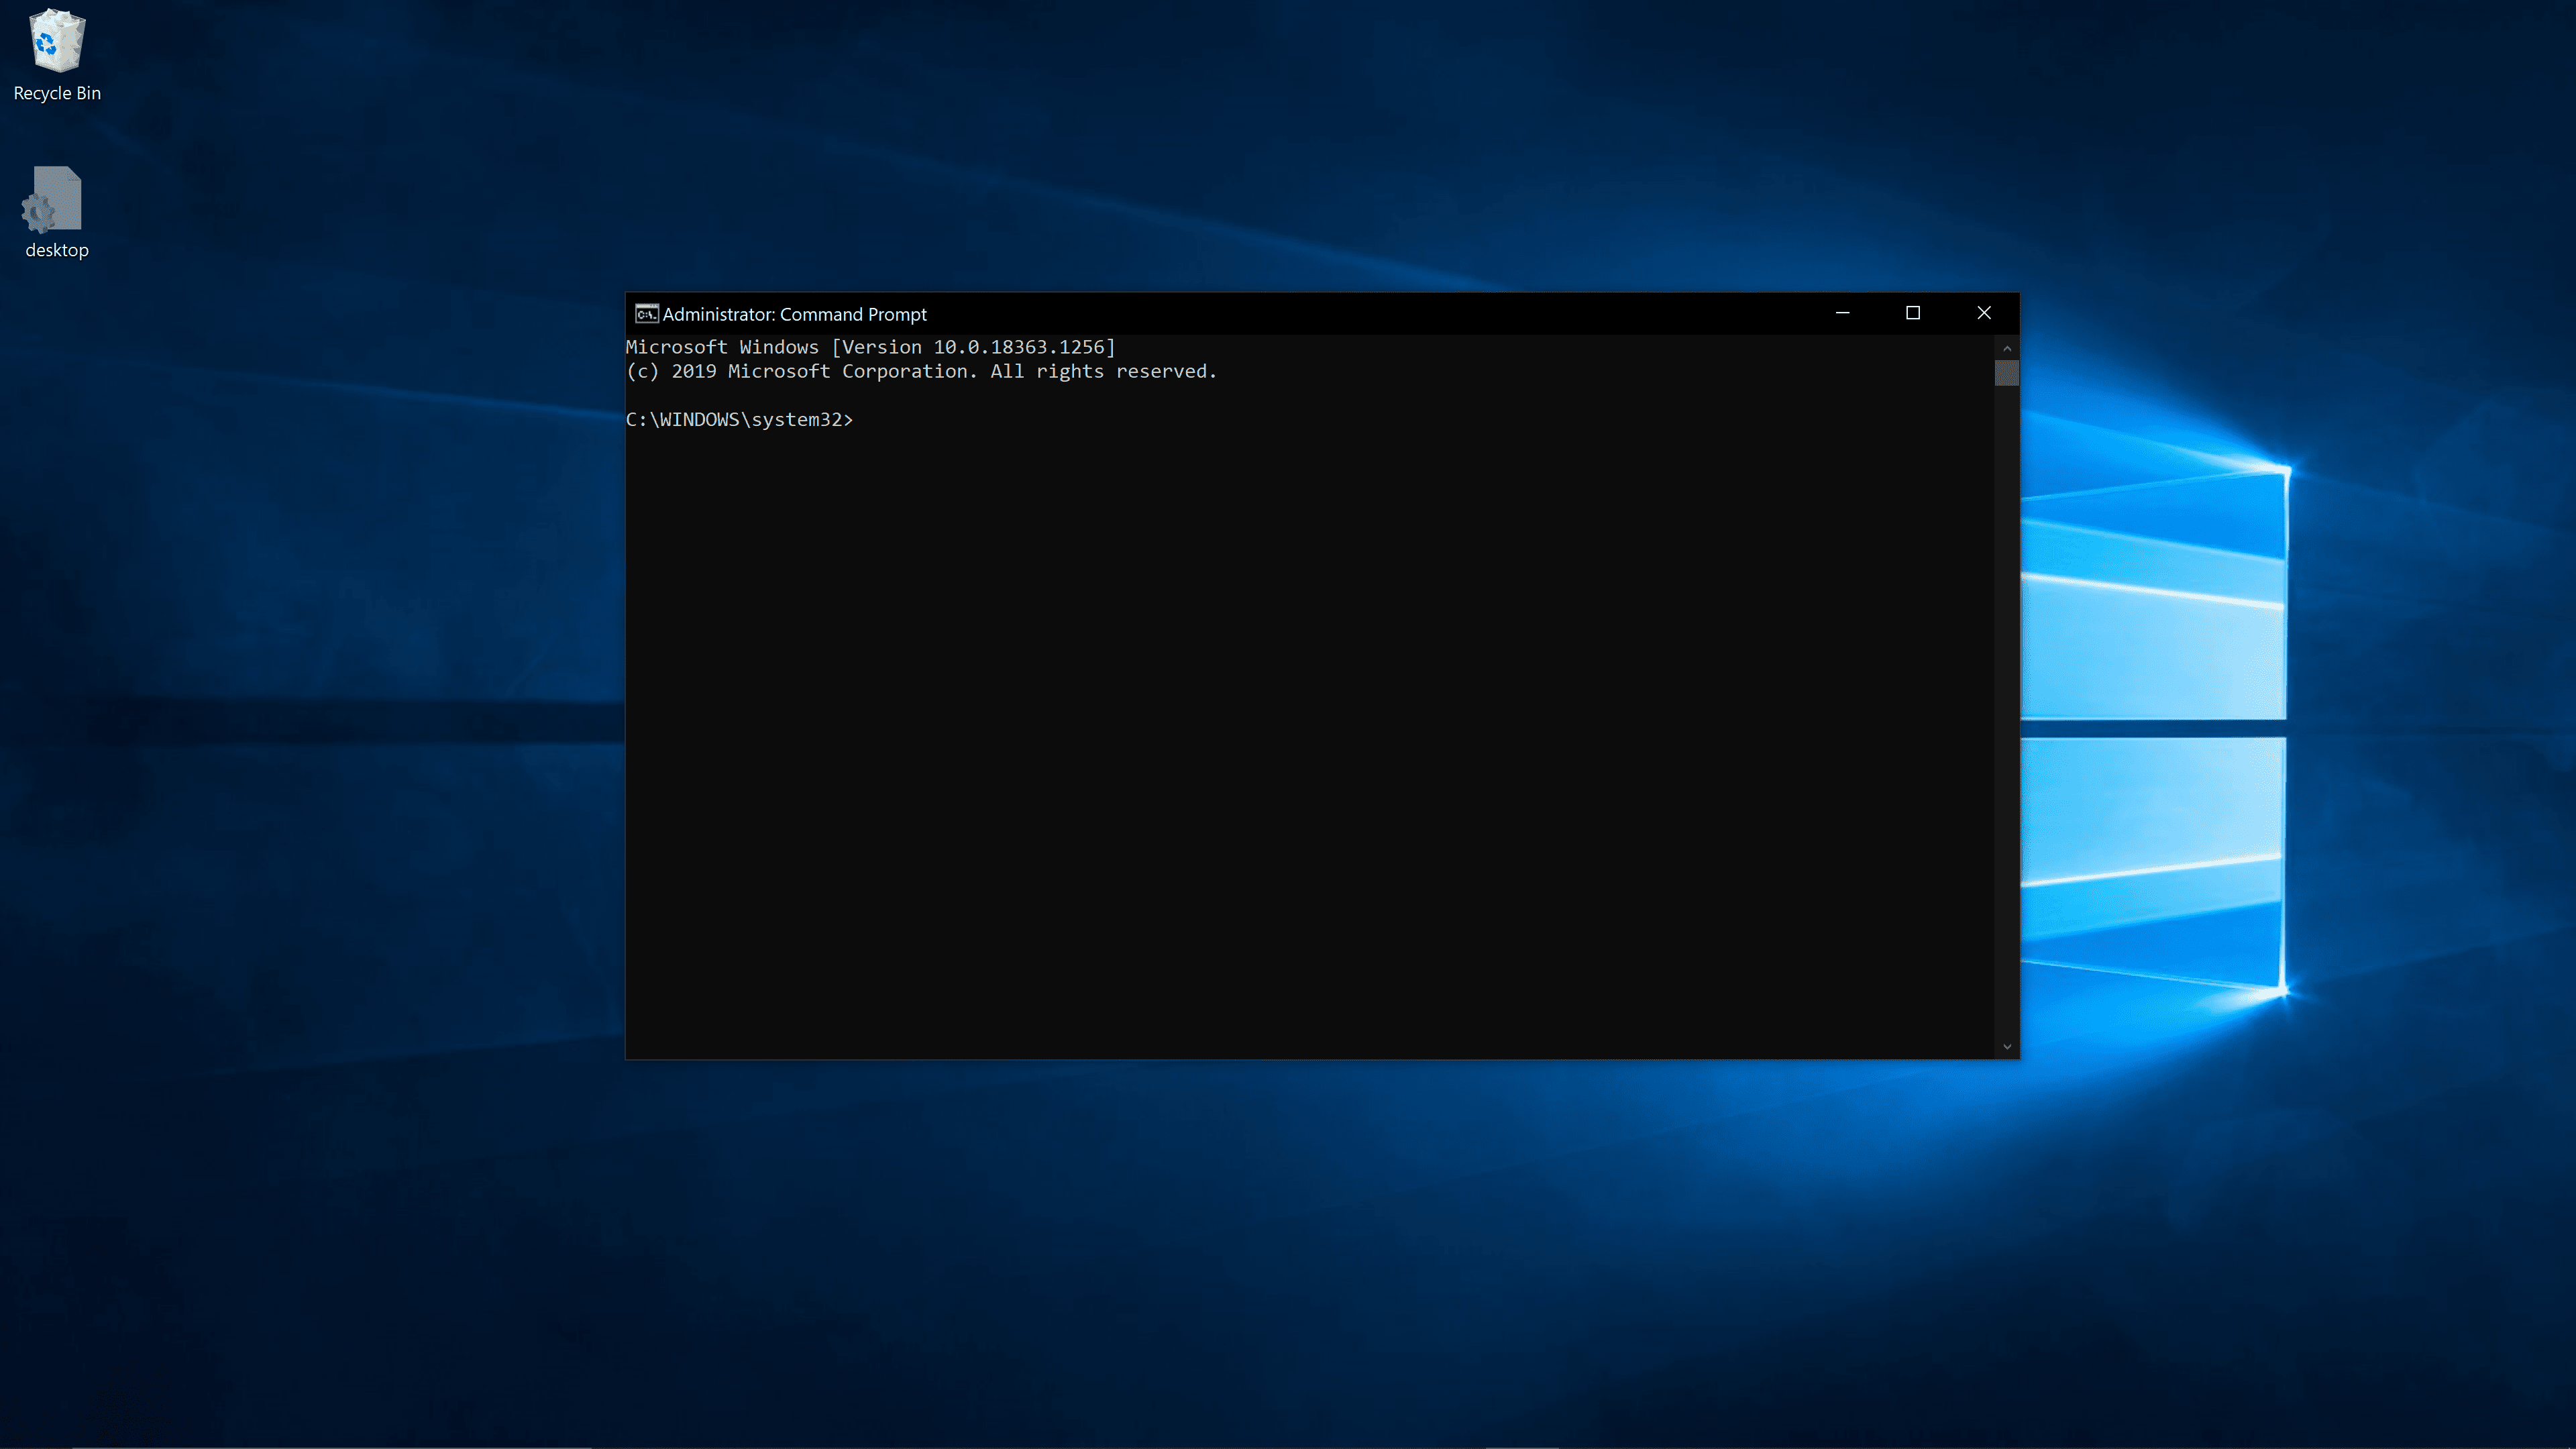
Open Start on Windows 11.
-
Search for Command Prompt, right-click the top result, and select the Run as administrator option.
-
Type the following command to see your current networking configuration and press Enter:
ipconfig /all
-
Under the network adapter section, confirm the adapter’s name and these fields:
- IPv4
- DNS Servers
-
Type the following command to set the new DNS server address on Windows 11 and press Enter:
netsh interface ip set dns name="Ethernet0" static 1.1.1.1
In the command, change Ethernet1 with the name of your adapter and 1.1.1.1 with the DNS server address for the service you want to use. You can also specify the address for the local DNS server (if applicable).
-
Type the following command to set an alternate DNS server address and press Enter:
netsh interface ip add dns name="Ethernet0" 1.0.0.1 index=2
In the command, change Ethernet1 with the name of your adapter and 1.0.0.1 with the preferred alternate DNS server address.
Once you complete the steps, you can use the command to confirm the new configuration.