
Set Photo Viewer as Default in Windows 11/10
Once the Windows Photos Viewer is activated on your PC, you can configure it to be your default photo/video viewer. Here are 2 ways to do so.
Using the Context Menu
Here is how you can set the Windows Photo Viewer as the default program to open any image on your system right from the context menu:
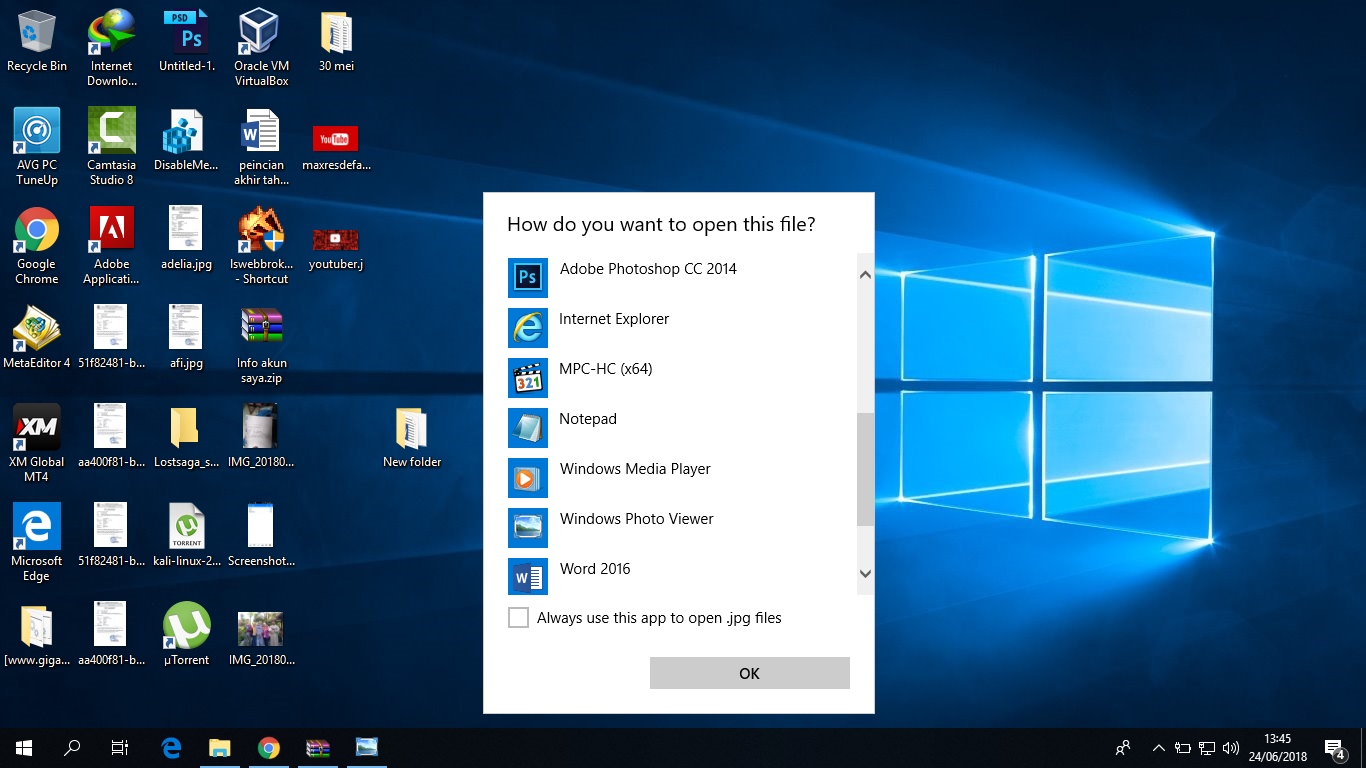
- Right-click on any image, expand Open with, and then click Choose another app.
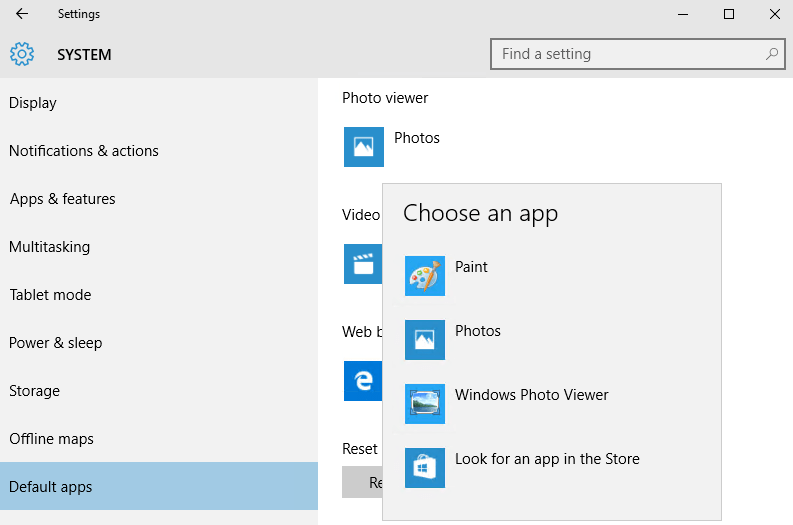
- In the popup window, click More apps.
- Now select Windows Photo Viewer from the list, check the box next to “Always use this app to open (file extension) files,” and then click OK.
The image will now open in the Photo Viewer. Also, all future images with the same format (file extension) will open in Photo Viewer.
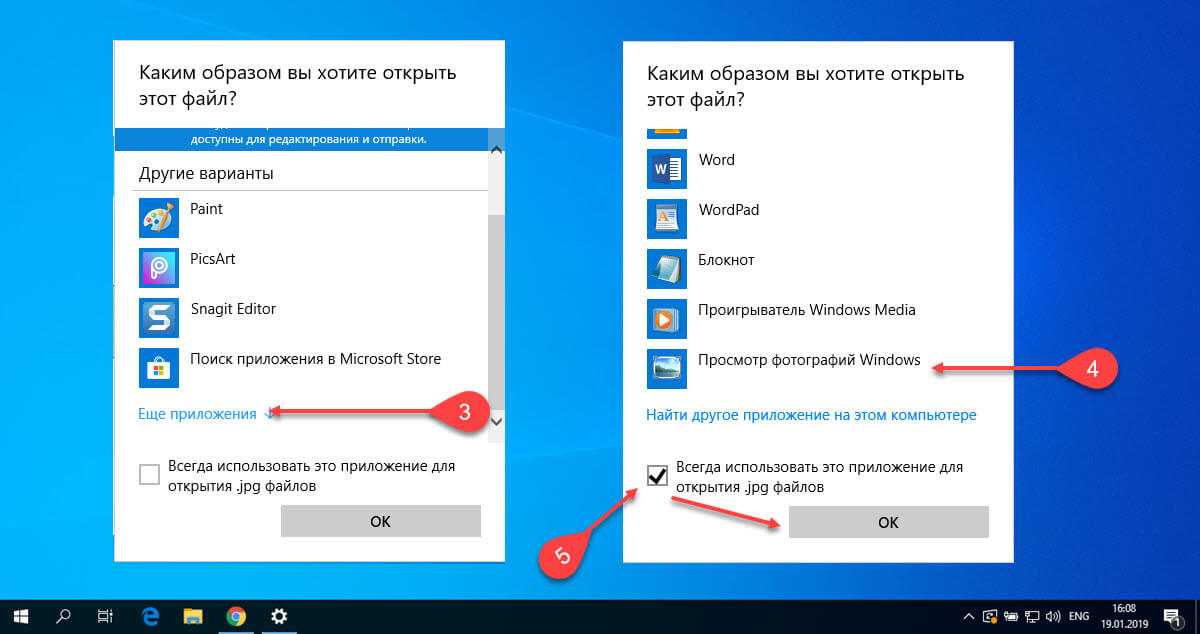
If you are using an older version of Windows 10, the option to set default programs will be a little different. Here are the screenshots for enabling Windows Photo Viewer in older versions of Windows 10:Install Windows Photo Viewer in Windows 10
Now, right click on any picture and select “Open with” and now select “Windows Photo Viewer” from list. Now your every photo will open in “Windows Photo Viewer” by default.
Enable Windows Photo Viewer in Windows 10
Check the box of “Always use this app to open .png files” so now you don’t need to tell your system again and again to use “Windows photo Viewer” to use as default photo viewer.
For every format, when you open it for the first time, you need to select “Windows Photo Viewer” for that particular format as default. And next time it will open auto in “Windows Photo Viewer”. As in the above shot, my picture was in PNG format, that’s why it said “Always use this app to open .png files”.
The format of the photo can be “JPEG/JFIF, Exif, TIFF, GIF, BMP, PNG, PPM, PGM, HDR, BPG or any other
Using the Settings App
You can also set the Photo Viewer as the default app for different image extension types using the Windows Settings app. Here’s how:
- Navigate to the following:
- Now search for png from the search bar at the top and then click on Choose a default. If the Photos app is set at its default, then click on it to replace it.
- Now click on Windows Photo Viewer in the list on the popup window, and then click Ok.
- Now perform steps 2 & 3 for the following image extensions as well:
- .tiff
- .tif
- .jpg
- .jpeg
- .jpe
- .jfif
- .bmp
- .dib
- .wdp
- .jxr
- .gif
Now any images/videos with the above file extensions will open with Windows Photo Viewer.
Как вернуть старый просмотр фотографий в Windows 10 с помощью Powershell
Самый простой, легкий и быстрый способ вернуть старый просмотр фотографий в Windows 10 это с помощью Powershell. Необходимо:
1. Откройте приложение Windows PowerShell через «запуск от имени Администратора». Оно находится в меню Пуск — Windows PowerShell. Или найдите через «Поиск в Windows» — нажмите рядом с кнопкой «Пуск» на значок с изображением лупы и введите в строку поиска «Windows PowerShell». Запустите программу.
![]() Откройте Windows PowerShell через режим Администратора
Откройте Windows PowerShell через режим Администратора
2. Скопируйте и вставьте в редактор Windows PowerShell следующие команды
If  ( -Not ( Test-Path "Registry::HKEY_CLASSES_ROOT\Applications\photoviewer.dll")){New-Item -Path "Registry::HKEY_CLASSES_ROOT\Applications\photoviewer.dll" -ItemType RegistryKey -Force}
If  ( -Not ( Test-Path "Registry::HKEY_CLASSES_ROOT\Applications\photoviewer.dll\shell")){New-Item -Path "Registry::HKEY_CLASSES_ROOT\Applications\photoviewer.dll\shell" -ItemType RegistryKey -Force}
If  ( -Not ( Test-Path "Registry::HKEY_CLASSES_ROOT\Applications\photoviewer.dll\shell\open")){New-Item -Path "Registry::HKEY_CLASSES_ROOT\Applications\photoviewer.dll\shell\open" -ItemType RegistryKey -Force}
Set-ItemProperty -path "Registry::HKEY_CLASSES_ROOT\Applications\photoviewer.dll\shell\open" -Name "MuiVerb" -Type "String" -Value "@photoviewer.dll,-3043"
If  ( -Not ( Test-Path "Registry::HKEY_CLASSES_ROOT\Applications\photoviewer.dll\shell\open\command")){New-Item -Path "Registry::HKEY_CLASSES_ROOT\Applications\photoviewer.dll\shell\open\command" -ItemType RegistryKey -Force}
Set-ItemProperty -path "Registry::HKEY_CLASSES_ROOT\Applications\photoviewer.dll\shell\open\command" -Name "(Default)" -Type "ExpandString" -Value "%SystemRoot%\System32\rundll32.exe `"%ProgramFiles%\Windows Photo Viewer\PhotoViewer.dll`", ImageView_Fullscreen %1"
If  ( -Not ( Test-Path "Registry::HKEY_CLASSES_ROOT\Applications\photoviewer.dll\shell\open\DropTarget")){New-Item -Path "Registry::HKEY_CLASSES_ROOT\Applications\photoviewer.dll\shell\open\DropTarget" -ItemType RegistryKey -Force}
Set-ItemProperty -path "Registry::HKEY_CLASSES_ROOT\Applications\photoviewer.dll\shell\open\DropTarget" -Name "Clsid" -Type "String" -Value "{FFE2A43C-56B9-4bf5-9A79-CC6D4285608A}"
If  ( -Not ( Test-Path "Registry::HKEY_CLASSES_ROOT\Applications\photoviewer.dll\shell\print")){New-Item -Path "Registry::HKEY_CLASSES_ROOT\Applications\photoviewer.dll\shell\print" -ItemType RegistryKey -Force}
If  ( -Not ( Test-Path "Registry::HKEY_CLASSES_ROOT\Applications\photoviewer.dll\shell\print\command")){New-Item -Path "Registry::HKEY_CLASSES_ROOT\Applications\photoviewer.dll\shell\print\command" -ItemType RegistryKey -Force}
Set-ItemProperty -path "Registry::HKEY_CLASSES_ROOT\Applications\photoviewer.dll\shell\print\command" -Name "(Default)" -Type "ExpandString" -Value "%SystemRoot%\System32\rundll32.exe `"%ProgramFiles%\Windows Photo Viewer\PhotoViewer.dll`", ImageView_Fullscreen %1"
If  ( -Not ( Test-Path "Registry::HKEY_CLASSES_ROOT\Applications\photoviewer.dll\shell\print\DropTarget")){New-Item -Path "Registry::HKEY_CLASSES_ROOT\Applications\photoviewer.dll\shell\print\DropTarget" -ItemType RegistryKey -Force}
Set-ItemProperty -path "Registry::HKEY_CLASSES_ROOT\Applications\photoviewer.dll\shell\print\DropTarget" -Name "Clsid" -Type "String" -Value "{60fd46de-f830-4894-a628-6fa81bc0190d}"
#
![]() Вставьте команды в приложение Windows PowerShell и запустите выполнение
Вставьте команды в приложение Windows PowerShell и запустите выполнение
3. После завершения выполнения всех команд, закройте приложение Windows PowerShell
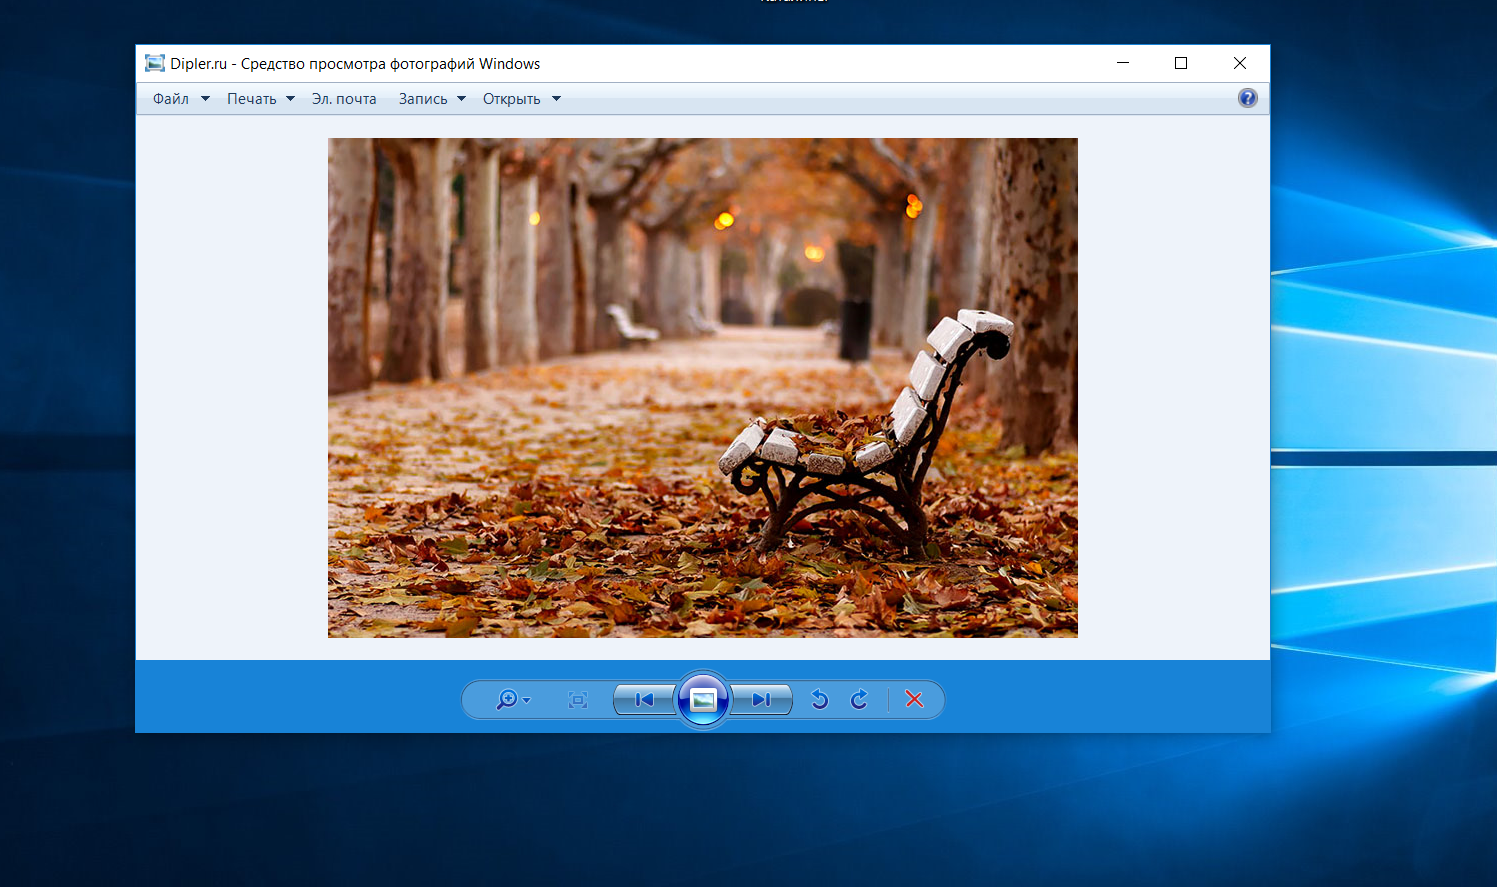
4. Готово! На вашем компьютере разблокировано классическое приложение «Средство просмотра фотографий». Теперь необходимо установить работу этой программы по умолчанию. Это можно сделать через «Контекстное меню».
Uninstall the Photos App from Windows 11/10
Once the Photo Viewer has been installed, you can choose to remove the Photos app from your device if it is no longer in use. However, it cannot be deleted like any other app since it comes pre-installed by Microsoft. Therefore, a special technique is required to delete the Photos app.
Here is how you can delete the Photos app using Windows PowerShell:
- Open Windows PowerShell with administrative privileges, and then paste the following cmdlet to obtain the names and full names of the packages installed on your device.
- Now look for Microsoft.Windows.Photos and then copy its full name to use in the next command.
- Now use the command below while replacing FullName with the copied name for the Photos app to delete it:
- You can now close PowerShell.
The Photos app will now be removed from your device. However, if you ever want to reinstall it, you can download the app directly from the Microsoft Store by searching for Microsoft Photos.
Как включить просмотр фотографий в Windows 10 через PowerShell
Еще один способ установить необходимые привязки для файлов — это использовать PowerShell и необходимые команды. Чтобы запустить утилиту PowerShell, нажмите правой кнопкой мыши на “Пуск” и выберите вариант “Windows PowerShell (администратор).
В открывшейся программе нужно прописать команды для ассоциации нужных расширений с приложением “Просмотр фотографий Windows”. Воспользуйтесь приведенным ниже кодом — просто скопируйте его и вставьте в Windows PowerShell целиком (вместе со значком # в конце), после чего нажмите Enter.
If  ( -Not ( Test-Path "Registry::HKEY_CLASSES_ROOT\Applications\photoviewer.dll")){New-Item -Path "Registry::HKEY_CLASSES_ROOT\Applications\photoviewer.dll" -ItemType RegistryKey -Force}

If  ( -Not ( Test-Path "Registry::HKEY_CLASSES_ROOT\Applications\photoviewer.dll\shell")){New-Item -Path "Registry::HKEY_CLASSES_ROOT\Applications\photoviewer.dll\shell" -ItemType RegistryKey -Force}

If  ( -Not ( Test-Path "Registry::HKEY_CLASSES_ROOT\Applications\photoviewer.dll\shell\open")){New-Item -Path "Registry::HKEY_CLASSES_ROOT\Applications\photoviewer.dll\shell\open" -ItemType RegistryKey -Force}

Set-ItemProperty -path "Registry::HKEY_CLASSES_ROOT\Applications\photoviewer.dll\shell\open" -Name "MuiVerb" -Type "String" -Value "@photoviewer.dll,-3043"

If  ( -Not ( Test-Path "Registry::HKEY_CLASSES_ROOT\Applications\photoviewer.dll\shell\open\command")){New-Item -Path "Registry::HKEY_CLASSES_ROOT\Applications\photoviewer.dll\shell\open\command" -ItemType RegistryKey -Force}

Set-ItemProperty -path "Registry::HKEY_CLASSES_ROOT\Applications\photoviewer.dll\shell\open\command" -Name "(Default)" -Type "ExpandString" -Value "%SystemRoot%\System32\rundll32.exe `"%ProgramFiles%\Windows Photo Viewer\PhotoViewer.dll`", ImageView_Fullscreen %1"

If  ( -Not ( Test-Path "Registry::HKEY_CLASSES_ROOT\Applications\photoviewer.dll\shell\open\DropTarget")){New-Item -Path "Registry::HKEY_CLASSES_ROOT\Applications\photoviewer.dll\shell\open\DropTarget" -ItemType RegistryKey -Force}

Set-ItemProperty -path "Registry::HKEY_CLASSES_ROOT\Applications\photoviewer.dll\shell\open\DropTarget" -Name "Clsid" -Type "String" -Value "{FFE2A43C-56B9-4bf5-9A79-CC6D4285608A}"

If  ( -Not ( Test-Path "Registry::HKEY_CLASSES_ROOT\Applications\photoviewer.dll\shell\print")){New-Item -Path "Registry::HKEY_CLASSES_ROOT\Applications\photoviewer.dll\shell\print" -ItemType RegistryKey -Force}

If  ( -Not ( Test-Path "Registry::HKEY_CLASSES_ROOT\Applications\photoviewer.dll\shell\print\command")){New-Item -Path "Registry::HKEY_CLASSES_ROOT\Applications\photoviewer.dll\shell\print\command" -ItemType RegistryKey -Force}

Set-ItemProperty -path "Registry::HKEY_CLASSES_ROOT\Applications\photoviewer.dll\shell\print\command" -Name "(Default)" -Type "ExpandString" -Value "%SystemRoot%\System32\rundll32.exe `"%ProgramFiles%\Windows Photo Viewer\PhotoViewer.dll`", ImageView_Fullscreen %1"

If  ( -Not ( Test-Path "Registry::HKEY_CLASSES_ROOT\Applications\photoviewer.dll\shell\print\DropTarget")){New-Item -Path "Registry::HKEY_CLASSES_ROOT\Applications\photoviewer.dll\shell\print\DropTarget" -ItemType RegistryKey -Force}

Set-ItemProperty -path "Registry::HKEY_CLASSES_ROOT\Applications\photoviewer.dll\shell\print\DropTarget" -Name "Clsid" -Type "String" -Value "{60fd46de-f830-4894-a628-6fa81bc0190d}"

 #
Будет выполнена привязка приложение “Просмотр фотографий Windows” ко всем популярным поддерживаемым форматам.
Восстановите Windows Photo Viewer в Windows 10 и 11
Для предварительного просмотра изображений с помощью Windows Photo Viewer в Windows 10 необходимо добавить необходимые ключи реестра для ассоциаций файлов. После применения файла реестра, указанного в этой статье, средство просмотра фотографий Windows отображается в качестве параметра на странице «Приложения по умолчанию» и в диалоговом окне «Открыть с помощью».

Выполните следующие действия, чтобы восстановить Windows Photo Viewer в Windows 10 и Windows 11:if(typeof __ez_fad_position!=’undefined’){__ez_fad_position(‘div-gpt-ad-winhelponline_com-large-leaderboard-2-0’)};
Шаг 1) Добавьте Windows Photo Viewer в программы по умолчанию
- Войдите в систему под учетной записью пользователя с правами администратора.
- Скачать restore_photo_viewer_windows_10.zip
- Распакуйте вложенный файл restore_photo_viewer_windows_10.reg в папку.
- Двойной клик restore_photo_viewer_windows_10.reg запустить его.
- Нажмите Да, когда вас попросят подтвердить. Опция Windows Photo Viewer теперь будет отображаться в программах по умолчанию или в приложениях по умолчанию. Файл реестра добавляет настройки ассоциации для следующих типов файлов изображений:
BMP, DIB, JFIF, JPE, JPEG, JPG, PNG, TIF, TIFF, WDP
Обратите внимание, что вам может потребоваться повторно применить указанный выше файл реестра после установки каждого обновления компонентов Windows 10/11 — например, 20H1, будь то чистая установка или установка обновления / восстановления на месте.СВЯЗАННЫЕ: кнопки просмотра фотографий Windows «Предыдущая и следующая» и клавиши со стрелками не работают
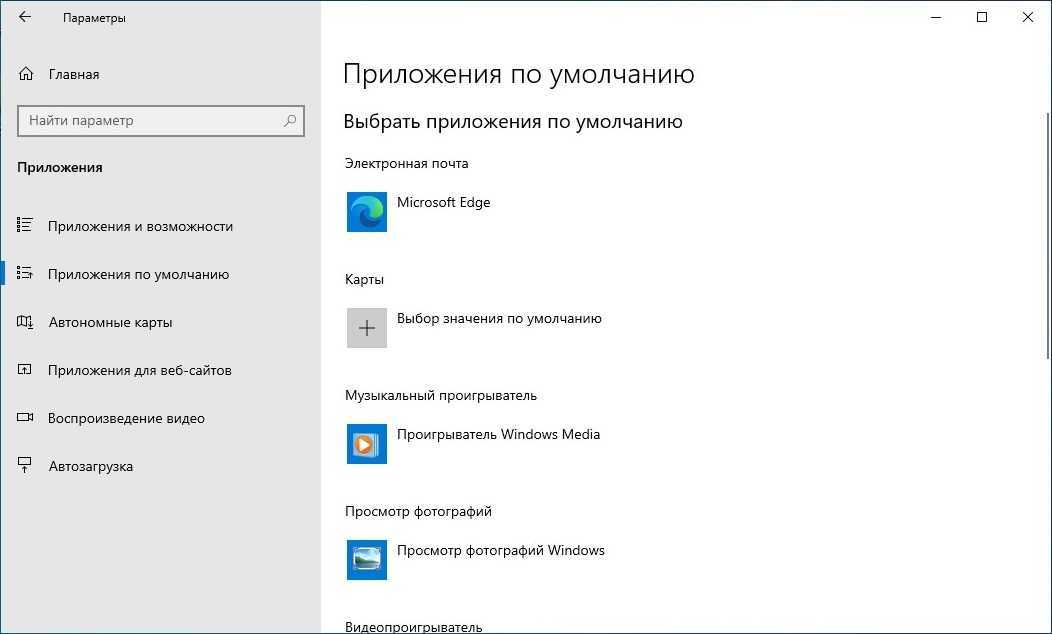
Шаг 2) Установите Windows Photo Viewer по умолчанию
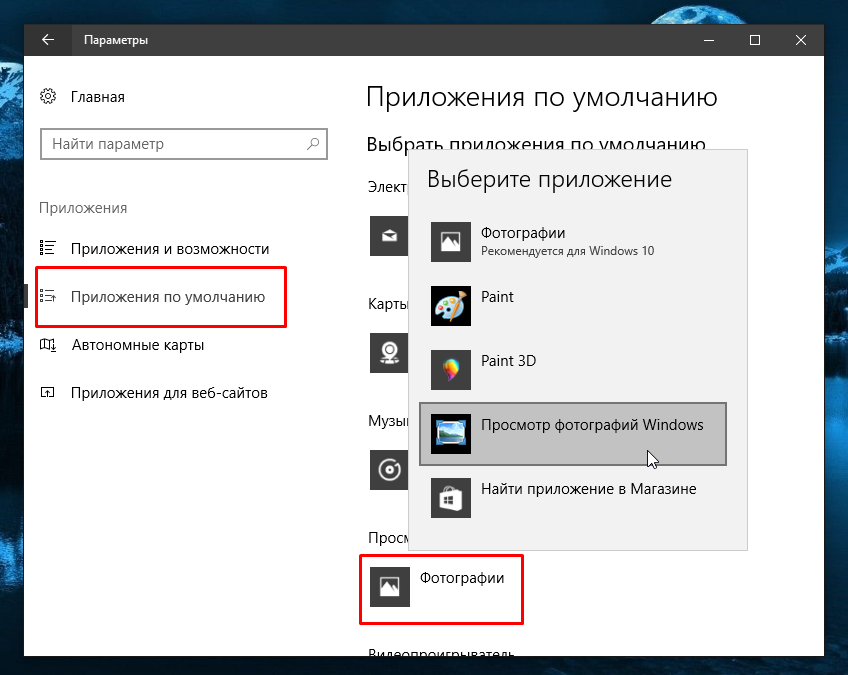
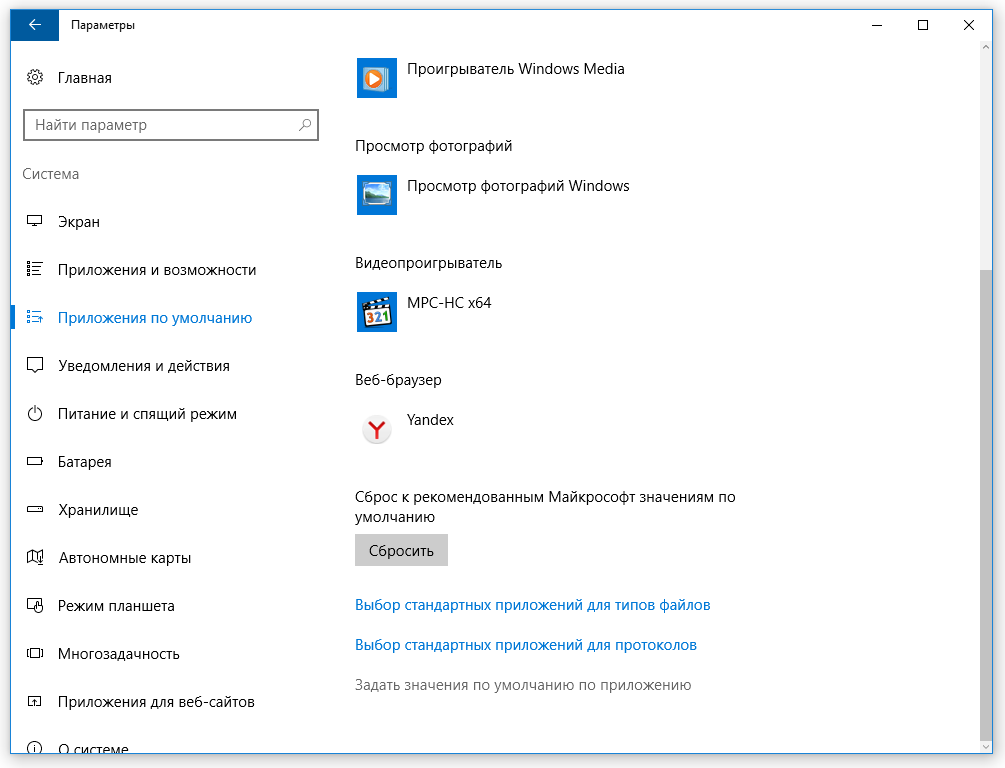
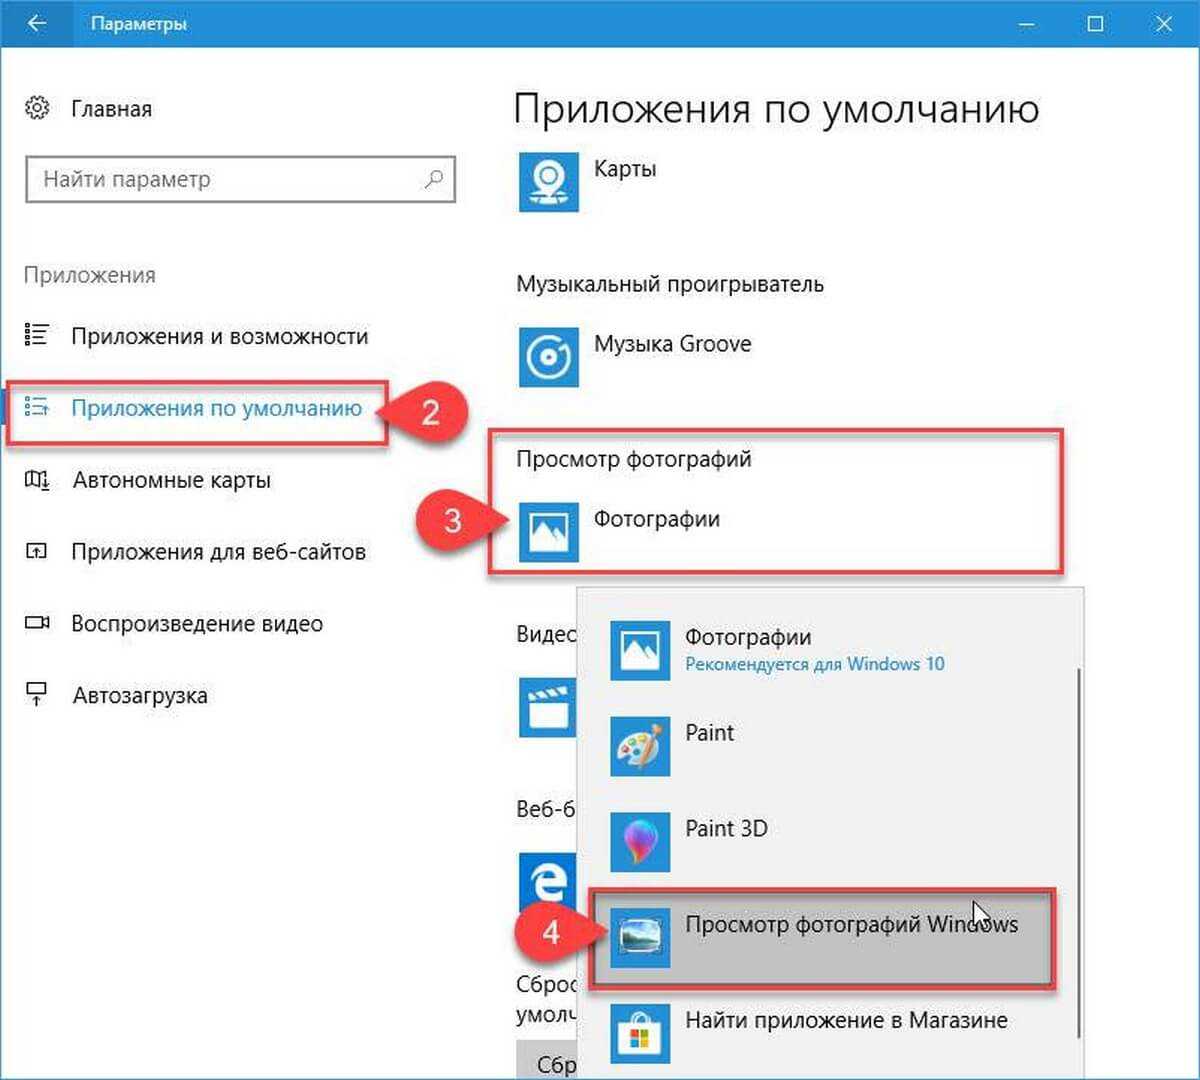
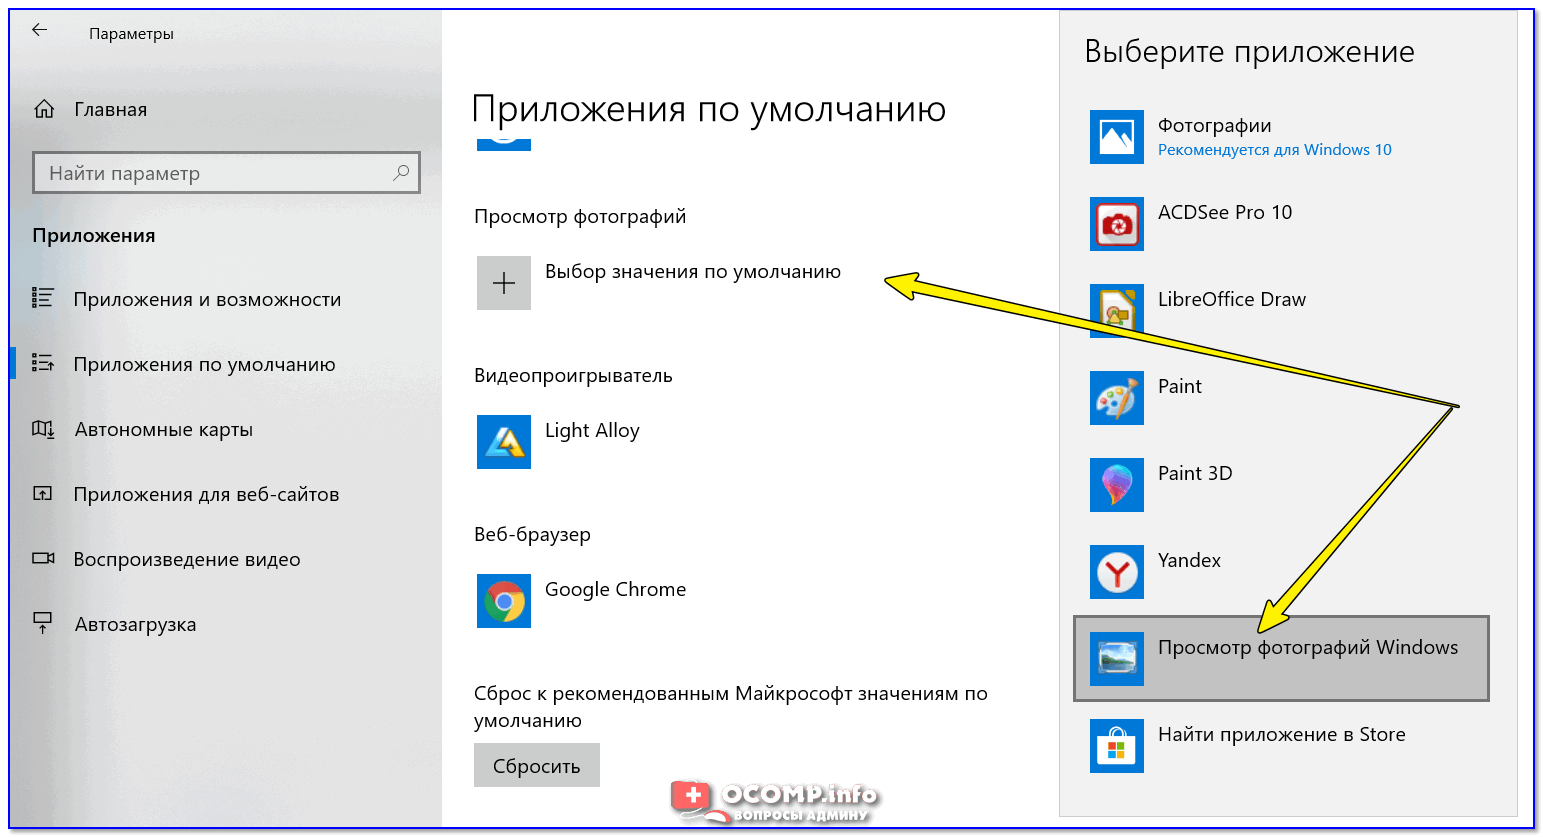
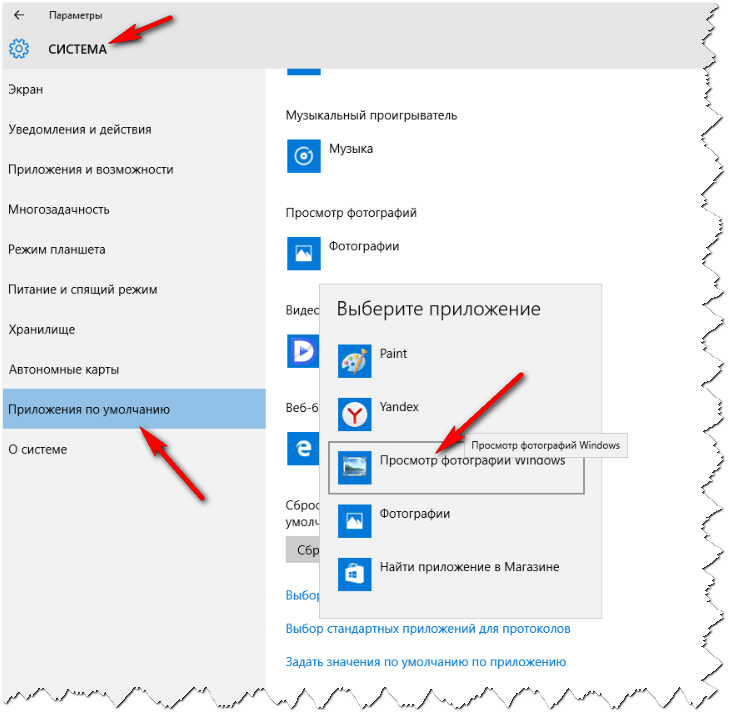
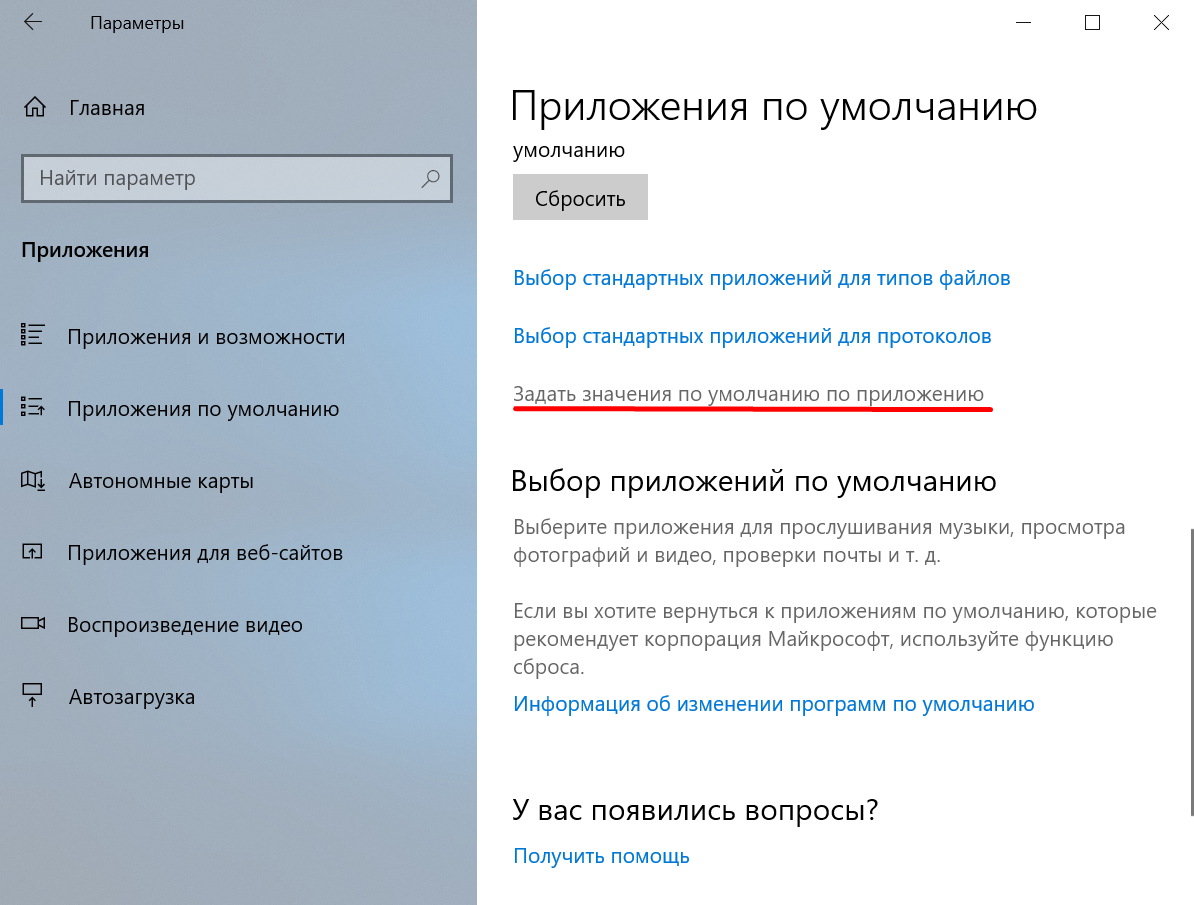
- Нажмите Пуск → Настройка → Приложения → Приложения по умолчанию.
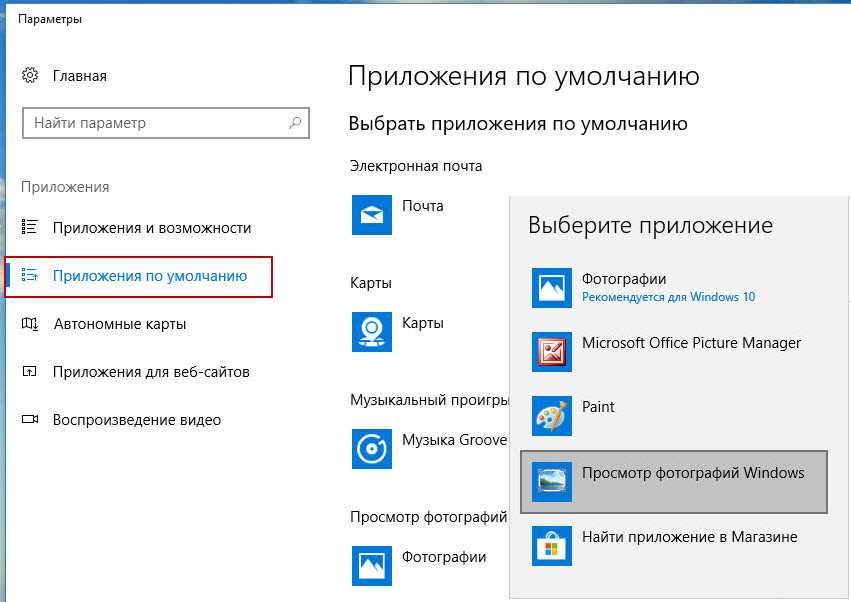
- В разделе «Средство просмотра фотографий» выберите из списка средство просмотра фотографий Windows.
if(typeof __ez_fad_position!=’undefined’){__ez_fad_position(‘div-gpt-ad-winhelponline_com-banner-1-0’)};Это связывает указанные выше типы файлов изображений с Windows Photo Viewer.
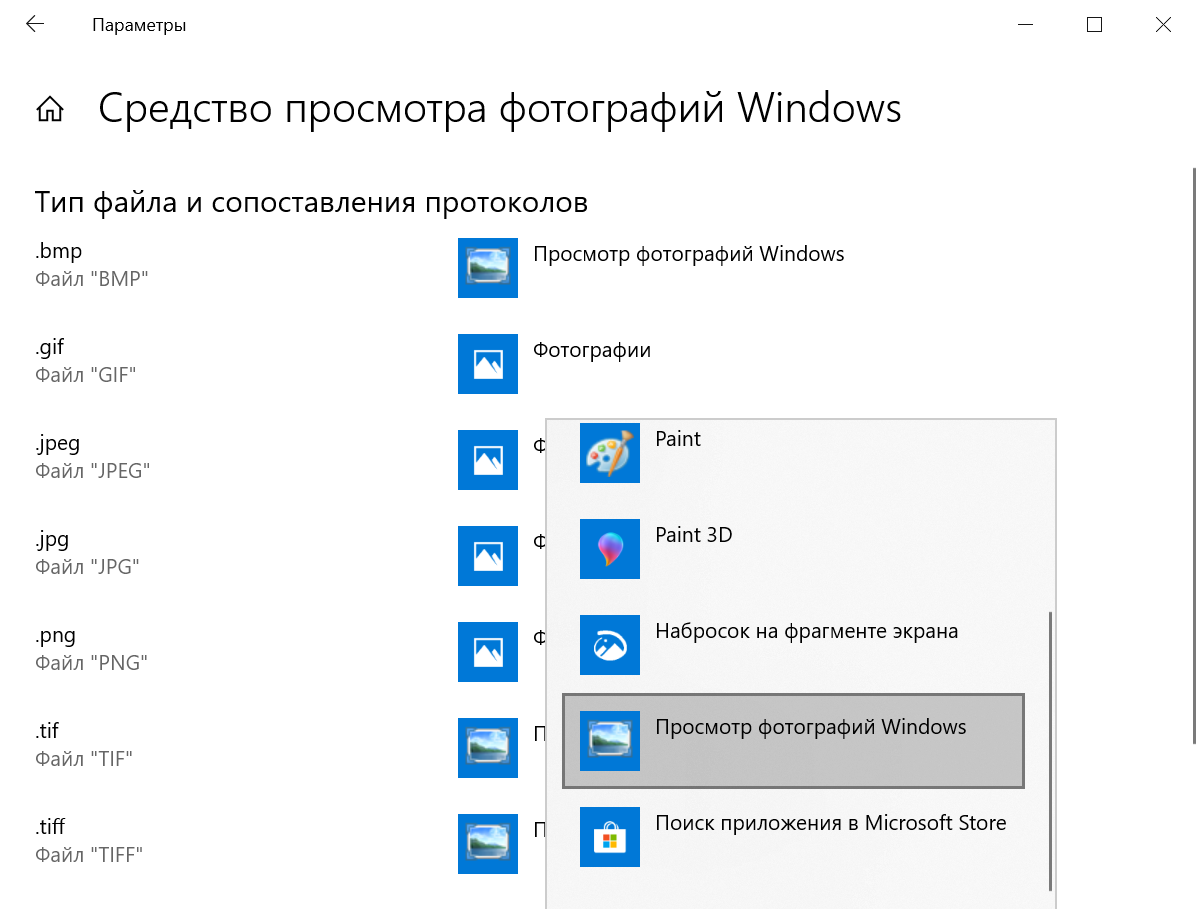
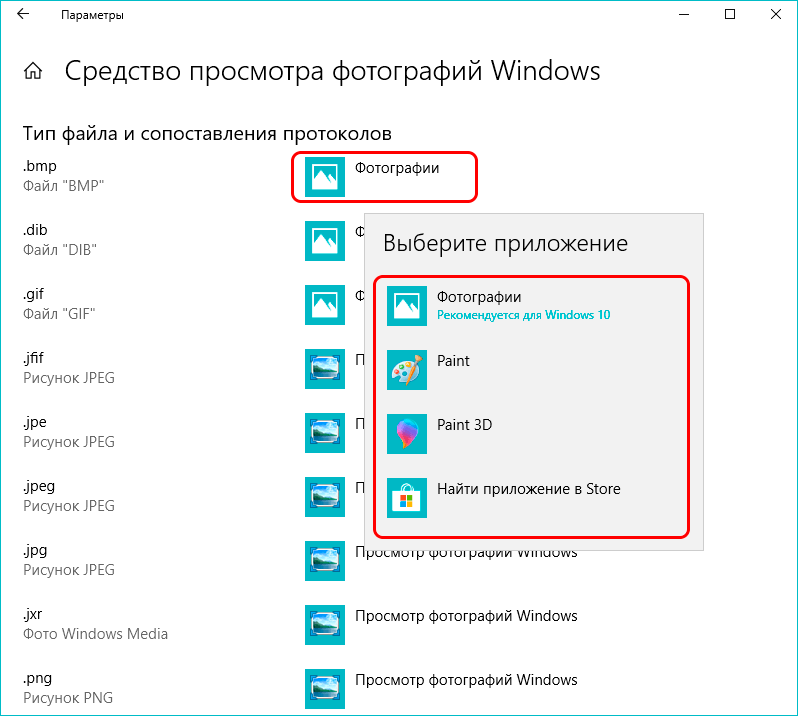
Чтобы установить его в качестве средства просмотра по умолчанию только для выбранных типов файлов изображений, нажмите Выбрать приложения по умолчанию по типу файла и настройте его соответствующим образом. Вы также можете использовать диалоговое окно «Открыть с помощью», чтобы настроить Windows Photo Viewer для каждого типа файла.
![]()
(Необязательно) Чтобы создать файл реестра вручную
- Откройте Блокнот и скопируйте в него следующее содержимое.
- Сохраните файл как «restore_photo_viewer_w10.reg“
- Дважды щелкните файл .reg, чтобы применить настройки.
СМОТРИ ТАКЖЕ: Изображения WebP выглядят очень темными в средстве просмотра фотографий Windows
Microsoft стремится превратить большинство встроенных инструментов и программ Windows 10 в современные приложения или приложения UWP. Вероятно, поэтому они решили скрыть Windows Photo Viewer в Windows 10/11.
Вышеуказанная процедура работает во всех сборках Windows 10 и 11.
С помощью программы Winaero Tweaker
Первый способ достаточно простой и быстрый, но если вы сами не хотите ничего трогать в реестре, то можно воспользоваться программой Winaero Tweaker, которая так же может решить поставленную задачу.
![]()
Заходите в папку Загрузок, распаковывайте архив и запускайте единственный исполняемый файл (собственно, он там один).
![]()
Откроется Мастер установки программы. Здесь все достаточно просто. Нажимайте «Next».
![]()
Потом отметьте маркером пункт «Portable mode», чтобы не устанавливать Winaero Tweaker, а просто извлечь нужные файлы, и снова жмите «Next».
![]()
Соглашаемся с лицензионными условиями – «I accept…» и продолжаем.
![]()
В верхнем поле будет указана папка, куда извлекутся все файлы: C:\WinaeroTweaker. Если хотите выбрать другой путь, нажмите «Browse». После этого выбирайте «Extract files».
![Средство просмотра фотографий в windows 10 — [pc-assistent.ru]](https://6msch59.ru/wp-content/uploads/5/2/a/52a6d132a145678fffab69a8a5d350fb.jpeg)


![]()
Когда все файлики извлекутся, открывайте в Проводнике ту папку, что выбрали на последнем шаге установки (я так и оставила: C:\WinaeroTweaker). Здесь нужно запустить файл, напротив которого в столбце «Тип» написано «Приложение».
![]()
Снова соглашаемся с лицензией: «I AGREE».
![]()
Откроется главное окно программы. В списке слева нам нужна группа «Get Classic Apps», пункт «Activate Windows Photo Viewer». Дальше справа нажмите на строчку с таким же названием.
![]()
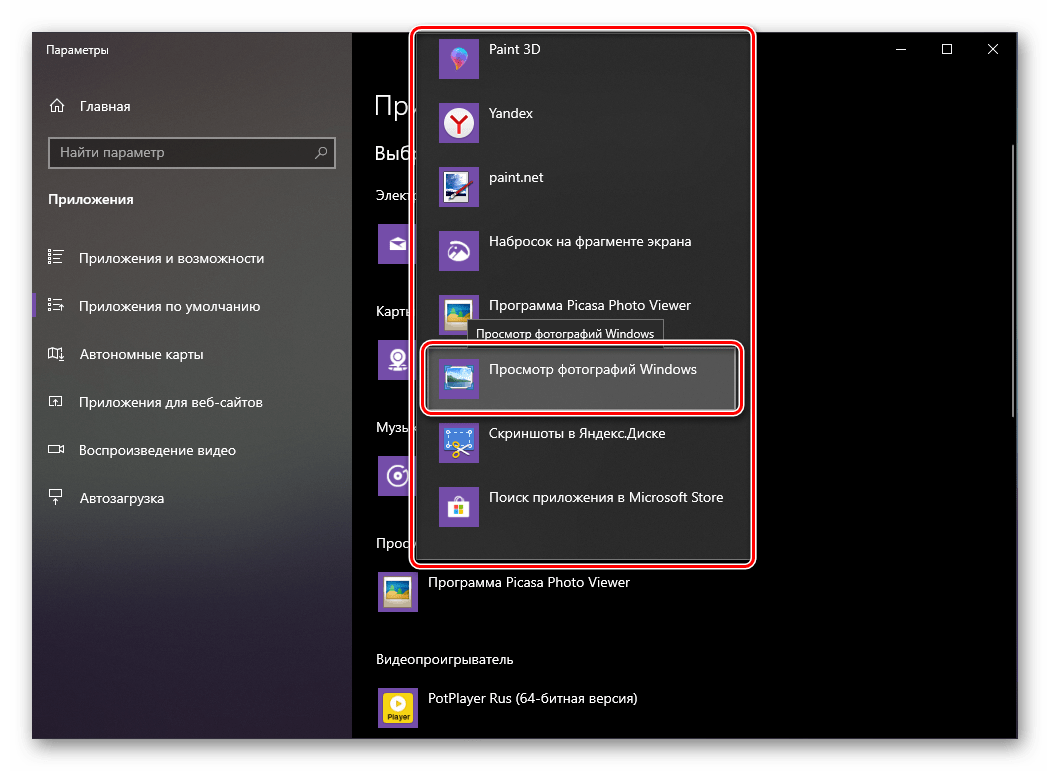
В уже знакомом окне слева выберите «Средство просмотра фотографий», дальше «Выбрать значения по умолчанию».
![]()
Отметьте или все расширения, или поставьте галочки только напротив нужных. Нажмите «Сохранить».
![]()
Теперь просто открывайте картинку или фото обычным способом, и она откроется в нужной программе.
![]()
Вот так, всего пару кликов и можно использовать Просмотр фотографий Windows на десятке для открытия любимых фото или изображений в привычном приложении.
Об авторе: Олег Каминский
Вебмастер. Высшее образование по специальности «Защита информации». Создатель портала comp-profi.com. Автор большинства статей и уроков компьютерной грамотности
Возвращаем старый редактор фотографий для Виндовс 10?
Итак, как я уже сказал, есть 3 метода, которые позволят вам произвести установку классического редактора фотографий, чтобы его применять как фоторедактор по умолчанию, для всех ваших картинок и фото.
- Метод даст вам возможность держать на своём компьютере целый Reg элемент, и у вас появится возможность для восстановления редактора фото на многих ПК;
- Метод 2 можно проделать быстрее, выполнив определённые операции в Windows Powershell.
- В методе 3 применим утилиту из картотеки dll
Майкрософт данный редактор из системы не убрала. Но, всё равно его сделать средством, чтобы смотреть изображения по умолчанию не получится, т.к. его нет в перечне системных программ по умолчанию. В новой же системе он работает лишь с элементами, у которых расширение TIFF. Поэтому, мы займёмся исправлением данного ограничения в Виндовс 10 и задействуем наш прежний редактор фото Windows 7.


Итак, мы можем изменить настройки в реестре, чтобы активировать новый, и данный фоторедактор снова будет у нас показывать различные фотки по умолчанию. Чтобы это сделать, необходимо произвести настройку в области графики в веточке реестра:
Это действие возможно проделать как ручным методом, так и применив софт Powershell.
Restore Windows Photo Viewer on Windows 11 and Windows 10
Enable Photo Viewer using Windows Registry
To enable Photo Viewer on your device, you must create new Windows Registry entries. Therefore, before we proceed, we suggest you create a system restore point if things do not go as planned.
You can also choose whether to enable Windows Photo Viewer for the current user account only or for all users on the PC.
Follow the steps below to replace the Photos app with Windows Photo Viewer:
Remove and replace image background…
Please enable JavaScript
Remove and replace image background with Photos app on Windows 11
- Since manually tweaking the Windows Registry is a tricky process, download the .reg file by clicking on the link below:
Restore Windows Photo Viewer (3.6 KiB, 1,083 hits)
- Once downloaded, right-click on it and extract its contents.
- Now navigate to the location where the contents of the zip folder have been extracted.
- You can choose to install Windows Photo Viewer for current user or all users on your PC by double-clicking the .reg file Restore Windows Photo Viewer for Current User or Restore Windows Photo Viewer for All Users, respectively.
- If prompted with a User Account Control (UAC), click Yes.
- Next, click Yes on the confirmation dialog box.
- On the next popup, click Ok.
- You must now restart the explorer.exe process. Follow the guide provided by clicking on the link, or alternatively you can just reboot the computer for the changes to take effect.
However, if you wish to revert the changes and remove the Windows Photo Viewer, either for all users or only the current user, you can use the UNDO Restore Windows Photo Viewer for All Users or UNDO Restore Windows Photo Viewer for Current User, respectively. Explorer.exe reboot will be required again.Undo restoration of Windows Photo Viewer
Once rebooted, the Photo Viewer will be installed on your device and ready to use. However, it will not replace the Photos app and could be used side-by-side.
Enable Photo Viewer using Restore Windows Photo Viewer App
If you are not comfortable making changes to your Windows Registries, you can also use the Windows Photo Viewer application to restore the legacy Photo Viewer. There is an application that is installed on your operating system to restore the Photo Viewer (obviously!). This app is valid for both Windows 11 and Windows 10. Below are the steps to install the app and use it to restore your Windows Photo Viewer:
- Start by downloading the Restore Windows Photo Viewer setup.
- Double-click it to execute the setup, which will launch the installation wizard. On the first screen, click Next.
- On the next screen, pick a location for the installation (or leave it to default) and click Next.
- On the Select Start Menu Folder screen, select a name for the folder (or leave it to default) and click Next.
- Now choose whether to create a desktop shortcut for the app and then click Next.
- Now click Install to begin the installation process.
- Once the installation is finalized, click Finish.
- The Restore WIndows Photo Viewer app will now run. First, choose which file extensions should open in the Photo Viewer by checking the adjacent boxes. Then select whether you would like to restore the Photo Viewer for the current user, or all users. When selected, click Restore Windows Photo Viewer.
- Now click OK on the pop-up dialog box.
- The Windows Settings app will now launch automatically. You can close the Settings app, as well as the Restore Windows Photo Viewer app.
The Settings app opens automatically, so you can set the Photo Viewer as the default application for any images that you now open. The topic is covered below, where we discuss how to make the Photo Viewer the default application.
You can also revert these changes and undo the restoration of the Photo Viewer, so all images can be opened with the Photos app. To do so, launch the app and click on Keep using Photos App. Note that this requires administrative privileges. Therefore, you must right-click the app icon and select Run as administrator from the context menu before reinstating the Photos app.Undo restoration of Photo Viewer and reinstate Photos app